

Hi everyone!
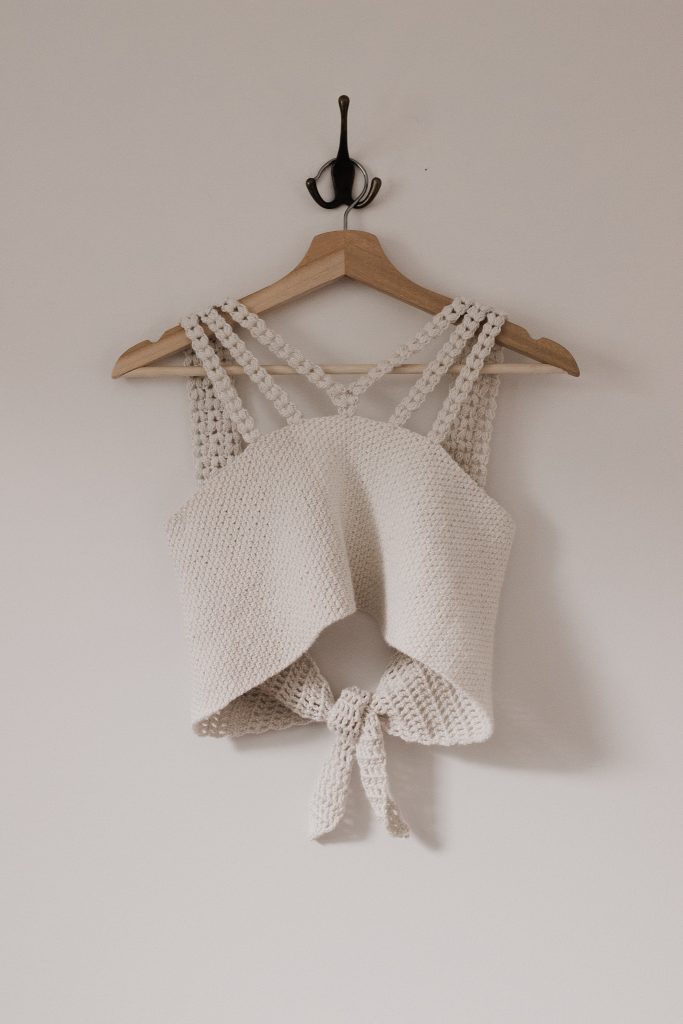
Today I’m sharing a brand new FREE pattern for a bandeau-style top using WeCrochet Paragon, called the Sun-Soaked Top.
Before we begin, here are some quick links for you:
- Find the PDF version on Ravelry here, on my website here, or on Etsy here.
- Add your finished project and view other completed projects on Ravelry here.
- Use the pattern hashtag #SunSoakedTop on Instagram to show off your makes!
- Shop WeCrochet Paragon here!
- Shop my WeCrochet exclusive summer pattern bundle here (5 patterns for $9.99)
- For any questions about this pattern, please email knitsnknotswpg@gmail.com and I’ll get back to you asap!
Preorder my book – Modern Crochet Sweaters: 20 Chic Designs for Everyday Wear – here!
If you want to be notified of all new pattern releases (and get exclusive discounts on all new paid patterns), sign up below!
This post contains affiliate links. This means, should you make a purchase, I will receive a small portion of the sale at no extra cost to you. All opinions are my own. View my Privacy + Disclosures Policy here. This post is sponsored by We Crochet.


About
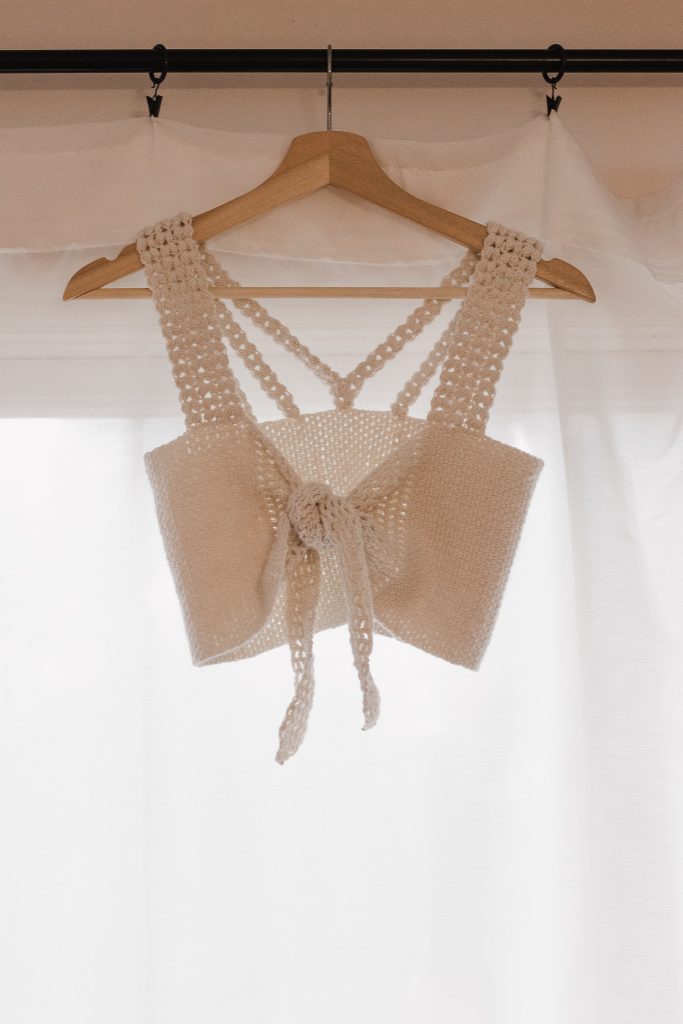
The Sun-Soaked Top is a bandeau-style summer top with six puff-stitch straps radiating from the center, converging into thick straps in the back. Rather than leave it as a typical bandeau top, there are thick, textured straps that add visual interest and create a comfortable piece that will stay in place as you wear it. The ease can be adjusted in the back, depending on how tightly you tie up the two back-ties. Perfect for distracted crocheting; this pattern uses just a few simple, beginner-friendly stitch patterns. For an even more bold look, try working up your version in stripes or using a contrasting colour for the back-ties and puff-stitch straps.
Sizing
This pattern is written in 9 sizes: XS (S, M, L, XL) (2X, 3X, 4X, 5X) to fit bust sizes 28-30 (32-34, 36-38, 40-42, 44-46) (48-50, 52-54, 56-58, 60-62)“. If you’re unsure which size you fall under, you can check out this sizing chart. For this pattern, if you’re in between sizes, size down.
See sizing chart below.
Materials
Yarn: sport —WeCrochet Paragon in White
- 50% Fine Merino Wool, 25% Baby Alpaca, 25% Mulberry Silk
- 123 yds [112 m] per 1.8-oz [50-g] skein
- Find this yarn on crochet.com or visit yarnsub.com to find comparable substitutes.
Yarn Substitution Notes: Substitute WeCrochet Paragon with any similar, category #2 sport weight yarn or category #1, fingering weight yarn. Most fibers should work fine in place of Twill, however, note that this is a form-fitting top, so it is recommended you opt for an animal fiber with some bounce and memory and avoid stretch-less plant-based fibers like cotton or linen. This will allow your top to stay taught to your body during wear without feeling restricting.
A note on yarn weight: You can choose a different yarn weight altogether and follow the pattern as it’s written, making sure to work each section of the pattern to the specified measurements.
Yardage: 4 (4, 4, 5, 6) (7, 8, 9, 10) balls of WeCrochet Paragon or 400 (430, 475, 600, 700) (850, 925, 1100, 1200) yds [366 (394, 435, 549, 641) (778, 846, 1006, 1098) m] of a similar sport weight/fingering weight yarn.
Hook: Size U.S. E/4 (3.5 mm) or size needed to obtain gauge
Notions: Tapestry needle, 6 locking stitch markers or pieces of scrap yarn to mark strap placement
Gauge
Gauge: 4 x 4″ [10 x 10 cm] = 30 sts and 24 rows in granite stitch; where each sc counts as a stitch and each ch counts as a stitch (see instructions below)
For Swatch:
FSC 35.
Row 1: Sc in 3rd ch from hook (note: skipped chs create 1 ch-sp), *ch 1, sk next ch, sc in next ch; rep from * to end of row, turn. [18 sc; 17 ch]
Row 2: Ch 2, sc in first ch-sp, *ch 1, sk next sc, sc in next ch-sp; rep from * to end of row, turn.
Rep Row 2 until you have at least 28 rows worked.
Block your swatch the same way you would your finished top. Measure the inner 4″ [10 cm] of your blocked swatch to get the most accurate measurement.
Note: The granite stitch has many names; it is also referred to as the linen stitch, seed stitch, mesh stitch, or moss stitch, to name a few.
Abbreviations (US Terms)
ch: chain
ch-sp: chain space
ch2-sp: chain 2 space (the space created by a ch-2)
dc: double crochet
dc2tog: double crochet 2 stitches together
FSC: foundation single crochet
Puff: [yarn over, insert hook into stitch, pull up a loop] 4 times for a total of 9 loops on hook, yarn over and pull through all loops.
rep: repeat
sc: single crochet
sk: skip
sl st: slip stitch
st(s): stitch(es)
Pattern Notes
Sizing: This top is written in nine sizes as follows: XS (S, M, L, XL) (2X, 3X, 4X, 5X). Make sure to follow the numbers for your size only.
Stitch Counts: Stitch counts are listed after each row. If no stitch count is given, there has been no change since the previous row. If only one number is provided, it applies to all sizes.
Reversible: There is no right side or wrong side with these stitch patterns; both sides are identical. You choose which side to wear as the “right side.” You will be instructed to designate a right side and wrong side before working the straps.
Turning Chain: The turning does count as a stitch for the main granite stitch section as well as the double crochet mesh back section. The turning chain for the granite stitch counts as 1 sc + 1 ch and is included in the final stitch counts of each row. The turning chain for the mesh, double crochet back section counts as 1 dc + 1 ch and is included in the final stitch counts of each row. The turning chain does not count as a stitch for the puff stitch straps.
Construction: The front of this top is worked in one long rectangle before adding the two identical, mesh, back-ties. The puff stitch straps are added last.
Schematic

Measurement Chart
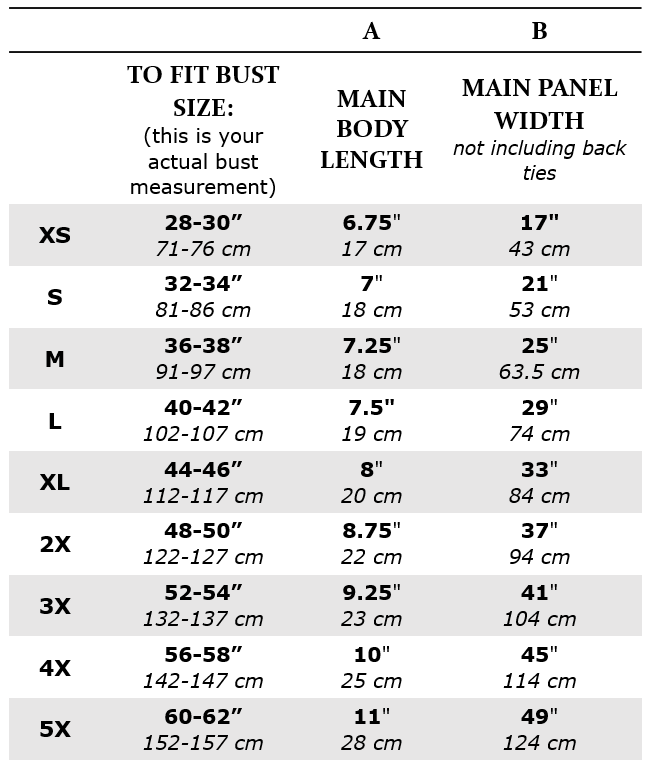
This chart shows the finished garment measurements. Find your bust size in the first column and make that size. Since this top is tied up in the back, the amount of ease it is worn with depends on how tight you tie it. I recommend you choose your true size and then adjust the ease by adjusting how tight you tie your back straps. For reference, the model has a 34-inch [86-cm] bust and is wearing a size small. If between sizes, size down.
PATTERN
FRONT BODY PANEL
Row 1: Leaving a long tail for seaming, FSC 50 (52, 54, 56, 60) (64, 68, 74, 82), turn.
For a longer (or shorter) top than written for your size (see column A on of Measurement Chart above), work more (or fewer) foundation sts here in any multiple of 2. Note that additional length will require more yardage than listed for your size.
Row 2: Ch 2 (counts as 1 sc and 1 ch), sk first FSC, sc in 2nd FSC, *ch 1, sk next FSC, sc in next FSC; rep from * to end of row, turn. [26 (27, 28, 29, 31) (33, 35, 38, 42) sc; 25 (26, 27, 28, 30) (32, 34, 37, 41) ch-sp]
Row 3: Ch 2, sk first sc, sc in first ch-sp, *ch 1, sk next sc, sc in next ch-sp; rep from * to end of row, turn.
Rep Row 3 until you have a total of 102 (126, 150, 174, 198) (222, 246, 270, 294) rows worked, or until your piece measures approximately 17 (21, 25, 29, 33) (37, 41, 45, 49)” [43 (53, 63.5, 74, 84) (94, 104, 114, 125) cm].
Do not fasten off yet; continue with same working yarn.
BACK TIE
Row 1: Ch 3 (counts as 1 dc + 1 ch), sk first sc, dc in first ch-sp, *ch 1, sk next sc, dc in next ch-sp; rep from * to end of row, turn. [26 (27, 28, 29, 31) (33, 35, 38, 42) dc; 25 (26, 27, 28, 30) (32, 34, 37, 41) ch-sp]
Decrease Row: Ch 3, dc into 2nd ch-sp (skipping over the first sc, ch-sp, and second sc), *ch 1, sk next dc, dc in next ch-sp; rep from * to end of row, turn. [decreases row by 1 dc and 1 ch-sp]
Rep Decrease Row until you have a total of 7 dc remaining in your row (counting the turning ch as 1 dc).
Next 14 Rows: Ch 3, sk first dc, dc in first ch-sp, (ch 1, sk next dc, dc in next ch-sp; rep from * to end of row, turn. [7 dc; 6 ch-sp]
Next Row: Ch 3, dc into 2nd ch-sp (skipping over the first sc, ch-sp, and second sc), *ch 1, sk next dc, dc in next ch-sp; rep from * two more times (2 ch-sp remaining), dc2tog over these last 2 ch-sp, turn. [5 dc; 4 ch-sp]
Next Row: Ch 3, [dc2tog over next 2 ch-sp] 2 times, turn. [3 dc]
Next Row: Ch 2 (does not count as a st), dc3tog, (this dc3tog is worked over the 3 dc sts) ch 1 to secure this st.
Fasten off, weave in ends.
For the back tie on the opposite side of your work, return to your initial foundation row. We will work our second Back Tie onto this row. With either side of your work facing you, join yarn with a sl st into the first FSC.
Row 1: Ch 3 (counts as 1 dc + 1 ch), sk first FSC, dc in second FSC, *ch 1, sk next FSC, dc in next FSC; rep from * to end of row, turn. [26 (27, 28, 29, 31) (33, 35, 38, 42) dc; 25 (26, 27, 28, 30) (32, 34, 37, 41) ch-sp]
Rep all instructions from first Back Tie starting at Decrease Row.
STRAPS
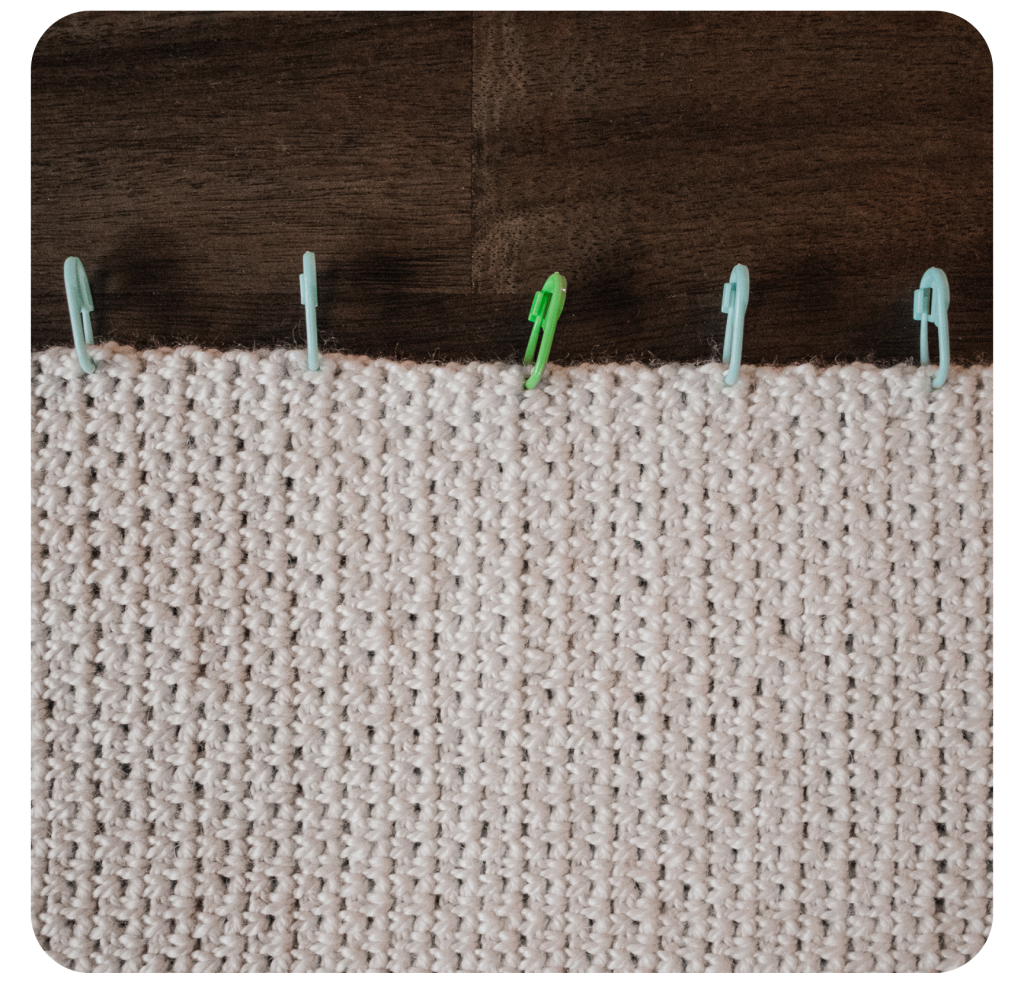
Before beginning the straps, you will place 5 markers to denote where each strap will begin.
On the front body panel, decide which edge you would like to be the top. Find the center of your panel and place one marker into the top-edge of this center-row. Count 9 (9, 9, 10, 10) (11, 11, 12, 12) rows from your center marker in both directions and place a marker into the edge of this row. Your Second Supporting Straps will be worked here. You should now have 3 markers placed. Count another 9 (9, 9, 10, 10) (11, 11, 12, 12) rows from your outermost markers in both directions and place a marker into the edge of this row. Your Third Supporting Straps will be worked here. (See Fig. 1 below)
Determine which side of your front panel you would like to be the “right side”. Place one last marker anywhere on this side of your fabric to reference when working the straps.
Center Strap
With RS facing, join yarn with a sl st into the edge of the center row, denoted by the first marker you placed.
Row 1: Ch 2, (Puff, ch 2, Puff) into this marked st, turn. [2 Puffs]
You can remove this center marker now.
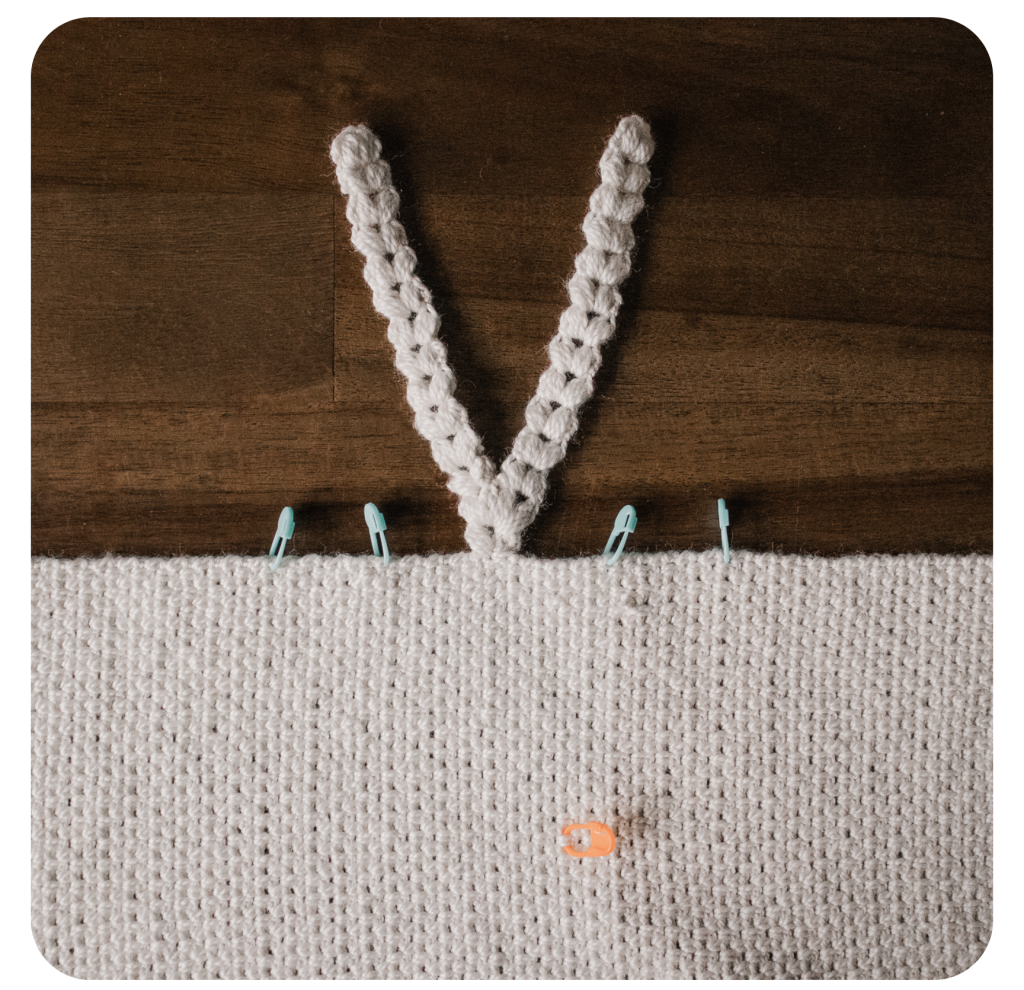
In Row 2, you will work 4 Puffs into the ch2-sp to begin the process of splitting your strap into two straps.
Row 2: Ch 2, (Puff, ch 2, Puff, ch 1, Puff, ch 2, Puff) into the center ch2-sp from Row 1 (place a marker into the first ch2-sp; you will come back to this later), turn. [4 Puffs]
Center Split: Part 1
Row 3: Ch 2, (Puff, ch 2, Puff) into first ch2-sp, turn. [2 Puffs]
Rep Row 3 eleven more times, fasten off, weave in ends.
Center Split: Part 2
Return to the marker you just placed into the ch2-sp in Row 2. With RS facing, join yarn to this marked ch2-sp with a sl st.
Row 3: Ch 2, (Puff, ch 2, Puff) into center ch2-sp, turn. [2 Puffs]
Rep Row 3 eleven more times, fasten off, weave in ends.
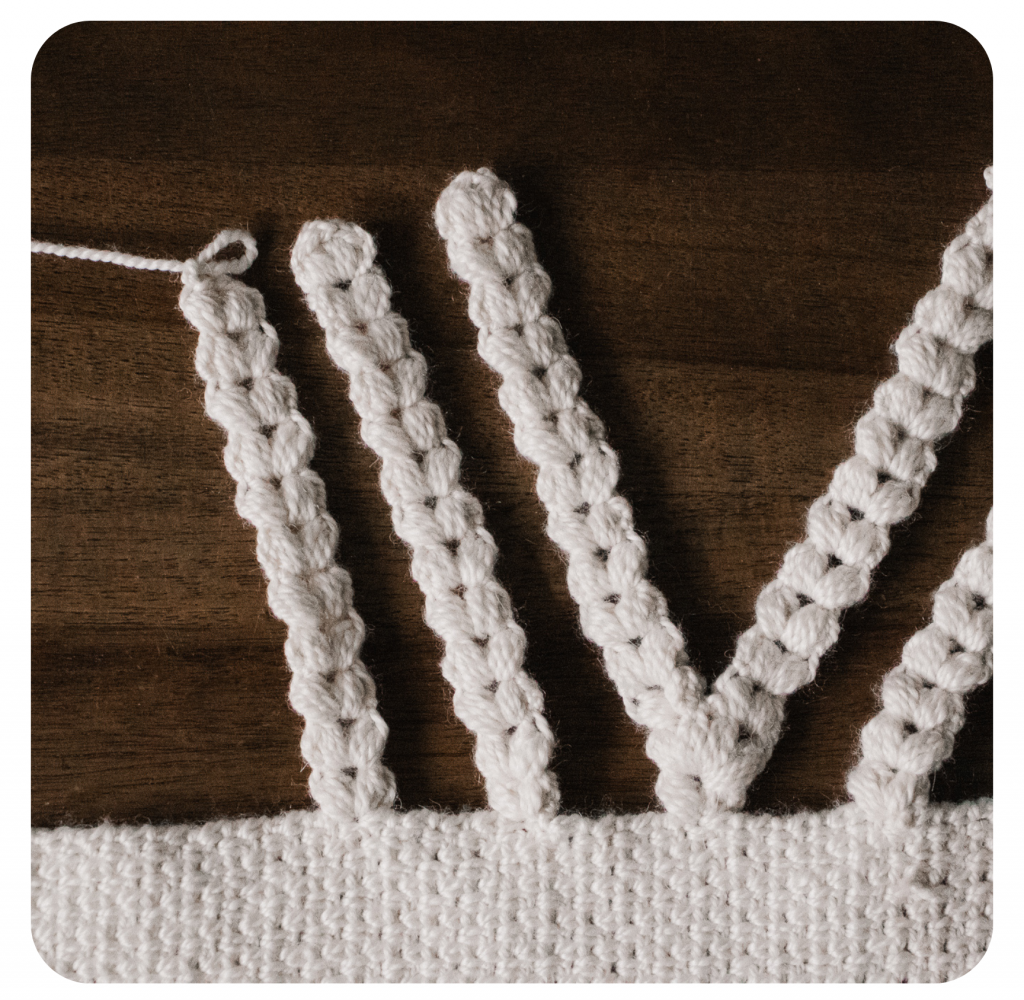
Your work should now look like Fig. 2 below.
Second Supporting Strap
Find the markers on either side of the Center Strap – this is where you will work the Second Supporting Straps. You can begin with either one.
With RS facing, join yarn with a sl st into the edge of one of these marked rows.
Row 1: Ch 2, (Puff, ch 2, Puff) into this marked st, turn. [2 Puffs]
You can remove this marker now.
Row 2-13: Ch 2, (Puff, ch 2, Puff) into the center ch2-sp from the previous row, turn.
Fasten off, weave in ends.
Rep for opposite Second Supporting Strap; be sure to begin with the RS facing.
Third Supporting Strap
You now have two strap markers remaining: the outermost markers. With RS facing, begin with the left-most strap. (Note: Left-handed crocheters begin with the right-most strap.)
With RS still facing, join yarn with a sl st into the edge of this marked row.
Row 1: Ch 2, (Puff, ch 2, Puff) into this marked st, turn. [2 Puffs]
You can remove this marker now.
Row 2-11: Ch 2, (Puff, ch 2, Puff) into the center ch2-sp from the previous row, turn.
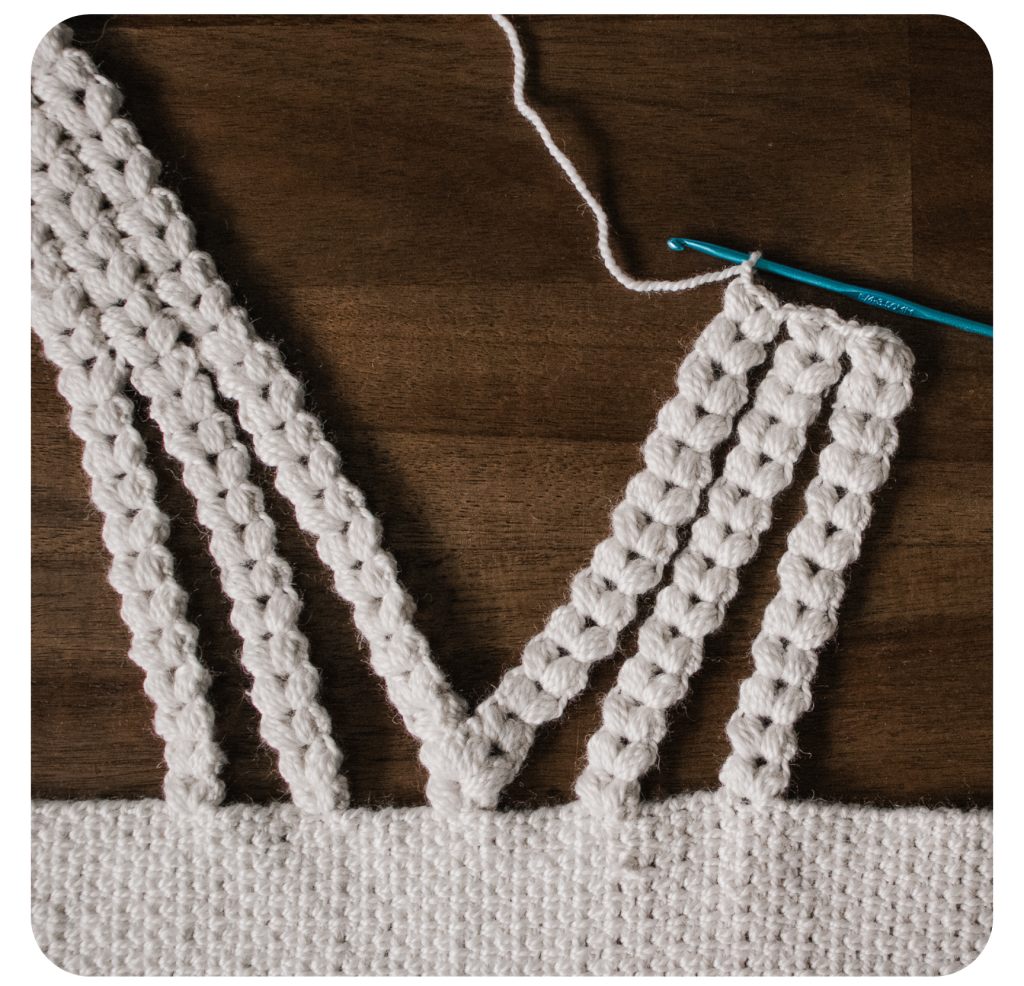
Your work should now look like Fig. 3 below.
Next, you will crochet across three puff stitch rows, connecting them to become one thick strap. Before working this row, make sure you have woven in all the ends from your previous straps.
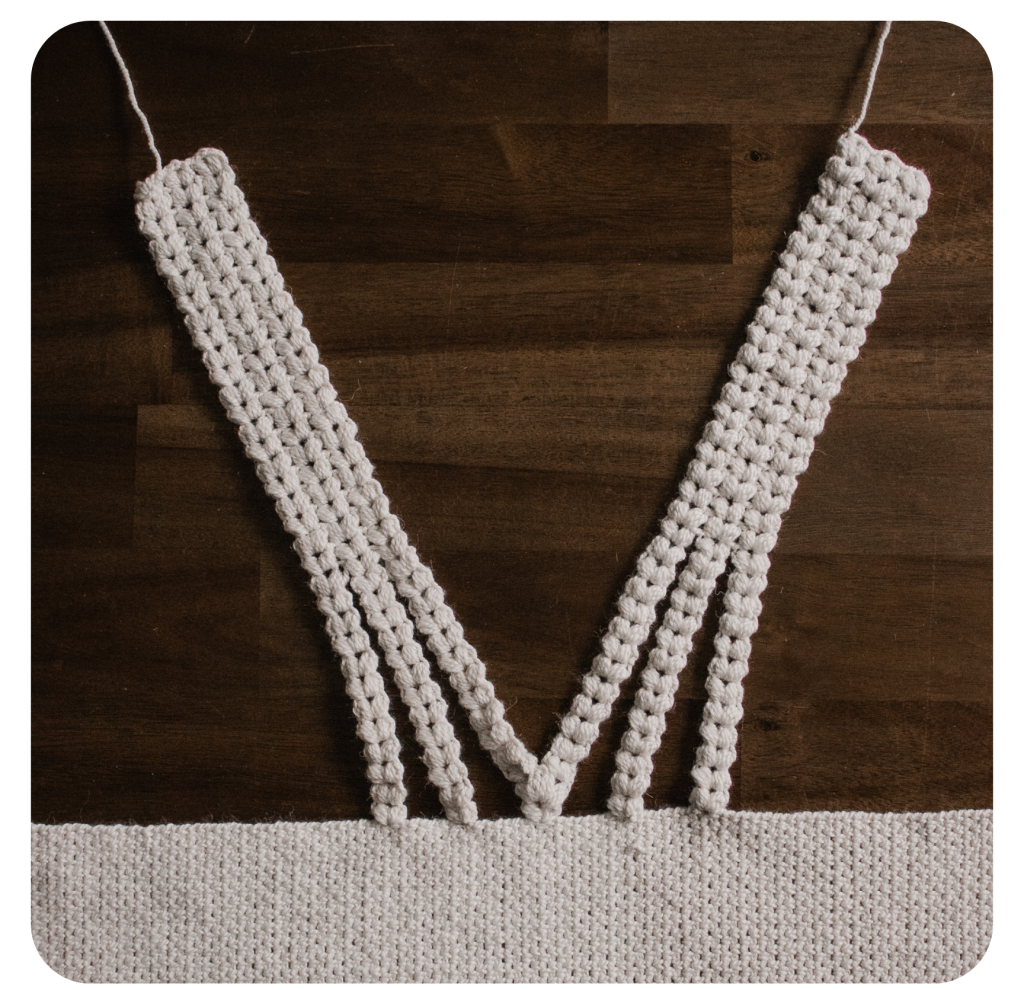
Connecting Row: Ch 2, (Puff, ch 2, Puff) into the ch2-sp from the previous row, ch 1, (Puff, ch 2, Puff) directly into the ch2-sp of the Second Supporting Strap, ch 1, (Puff, ch 2, Puff) directly into the ch2-sp of the Third Supporting Strap, turn. (See Fig. 4 below.)
Next 20 rows: Ch 2, (Puff, ch 2, Puff) into first ch2-sp, ch 1, (Puff, ch 2, Puff) into next ch2-sp, ch 1, (Puff, ch 2, Puff) into last ch2-sp, turn.
Fasten off, leaving 10” [25 cm] tail for seaming in place.
For your Third Supporting Strap on the opposite side, begin with the WS facing, and rep all instructions from your first Third Supporting Strap.
Once complete, your work should look like Fig. 5 below.
Seaming Your Straps
To seam your straps in place, ensure they are not twisted and pin them in place along the back-edge of your granite stitch panel, just before the back-ties begin. It is important they are seamed along the top edge just before the back-ties, as this placement will prevent your granite stitch panel from bunching once your finished top is tied up.
With a tapestry needle and the 10” [25 cm] tail, seam the strap to the back of your panel using the whip stitch or seaming method of your choice. Rep for other side.
Weave in any remaining ends. Block using desired method if needed.
#SunSoakedTop
That’s it! Hope you love your new top!
If you’d like an easy-to-read printable PDF, find it here on my website or here on Ravelry, or here on Etsy!
If you love warm-weather crochet, check out my post here which includes 21 lightweight spring pieces!
Here are some other free patterns you might like – Chasing Summer, the Tyndall Top, Goldstone Bralette, Linden Cardigan, the Teulon Tank!
I can’t wait to see your WIPs! Make sure to tag me @knitsnknotswpg and use the pattern hashtag #SunSoakedTop so that everyone can see your projects!
Happy crocheting,
x
Janine
You May Also Like


