Hi all!
This post includes everything you need to know about the Dreamhouse Blanket, a playful garter stitch throw featuring a bright, self-striping yarn that creates the unique color changes for you!
Get the Dreamhouse Blanket Lion Brand Kit here (comes with yarn + free PDF pattern)!
Before we begin, here are some quick links for you:
- Find the PDF version on Ravelry, Etsy, and my website.
- Add your finished project to Ravelry here!
- Shop the recommended yarn, Lion Brand Ice Cream Big Scoop, here.
- For any questions about this pattern, please email knitsnknotswpg@gmail.com and I’ll get back to you asap!
Shop my new book – Modern Crochet Sweaters: 20 Chic Designs for Everyday Wear – here!
If you want to be notified of all new pattern releases (and get exclusive discounts on all new paid patterns), sign up below!
This post contains affiliate links. This means, should you make a purchase, I will receive a small portion of the sale at no extra cost to you. All opinions are my own. View my Privacy + Disclosures Policy here.

About
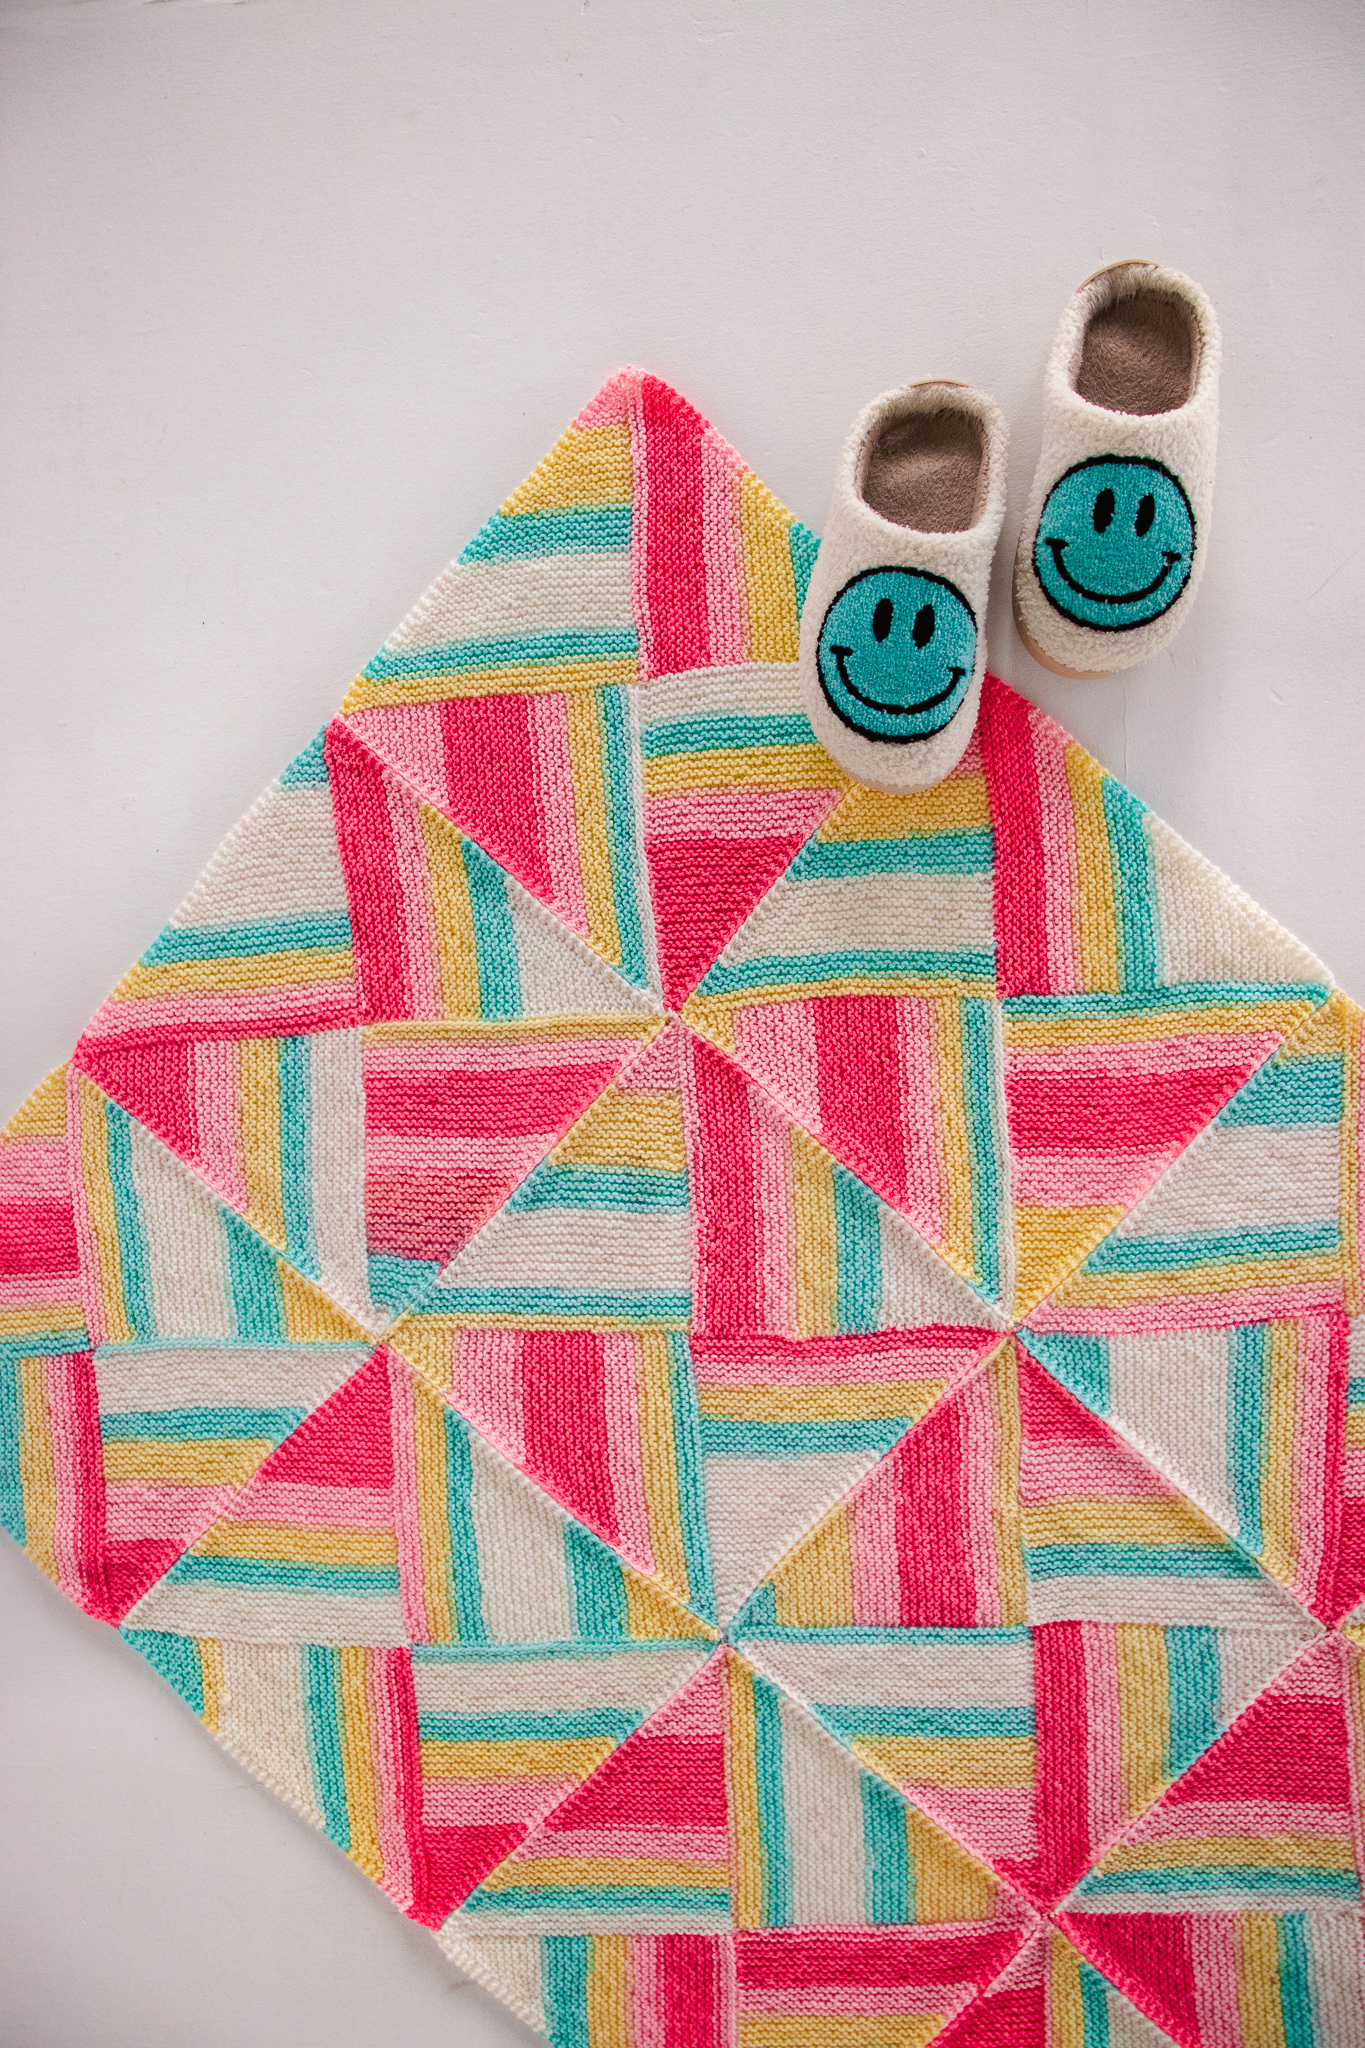
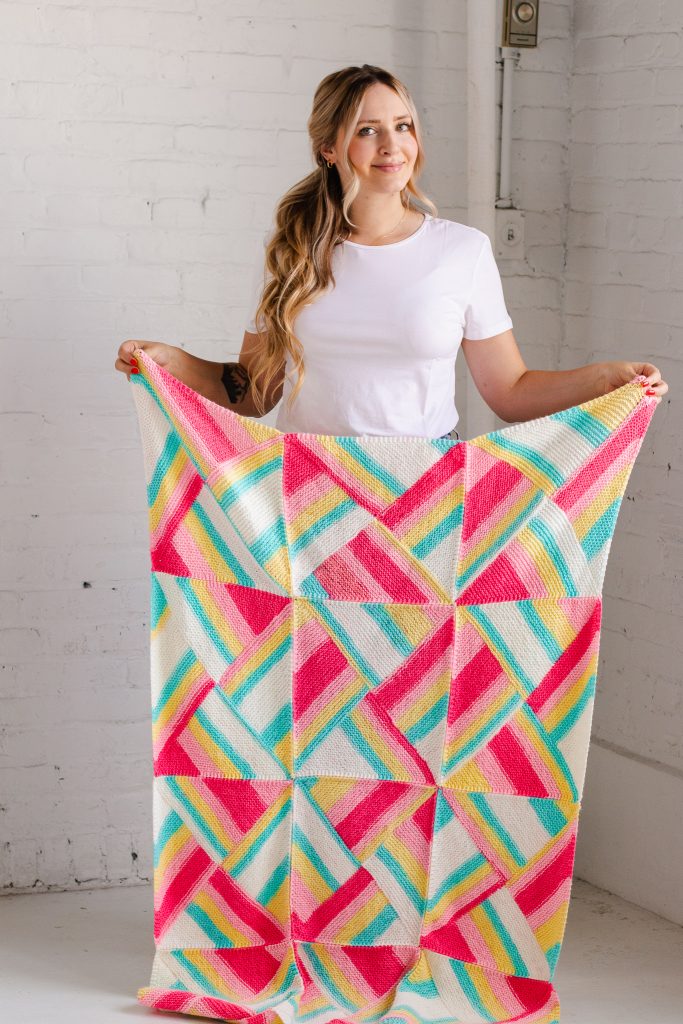
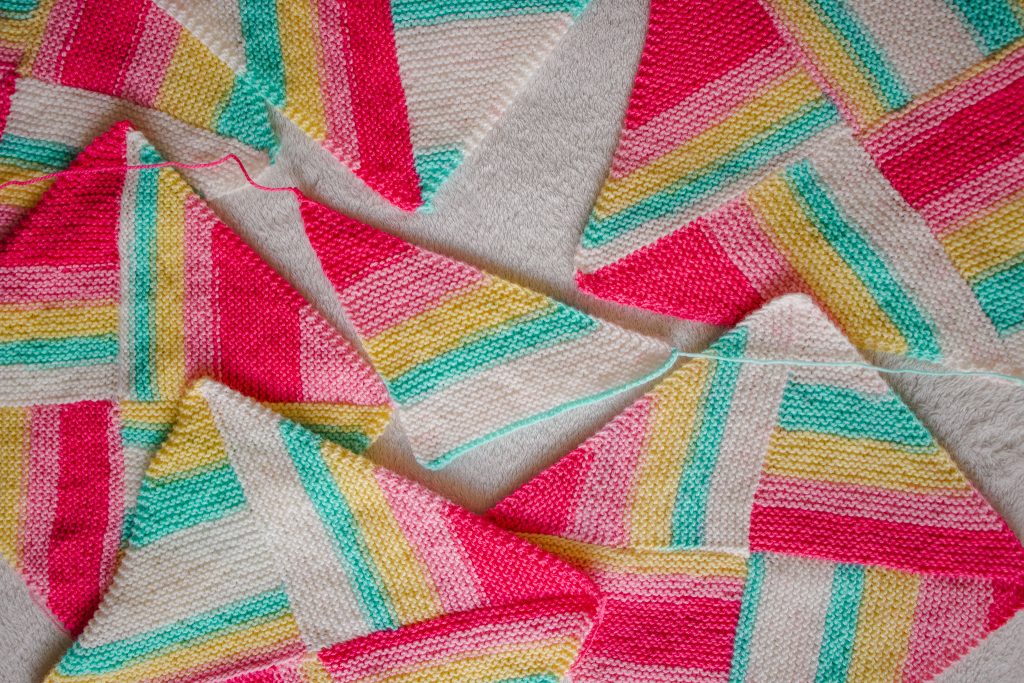
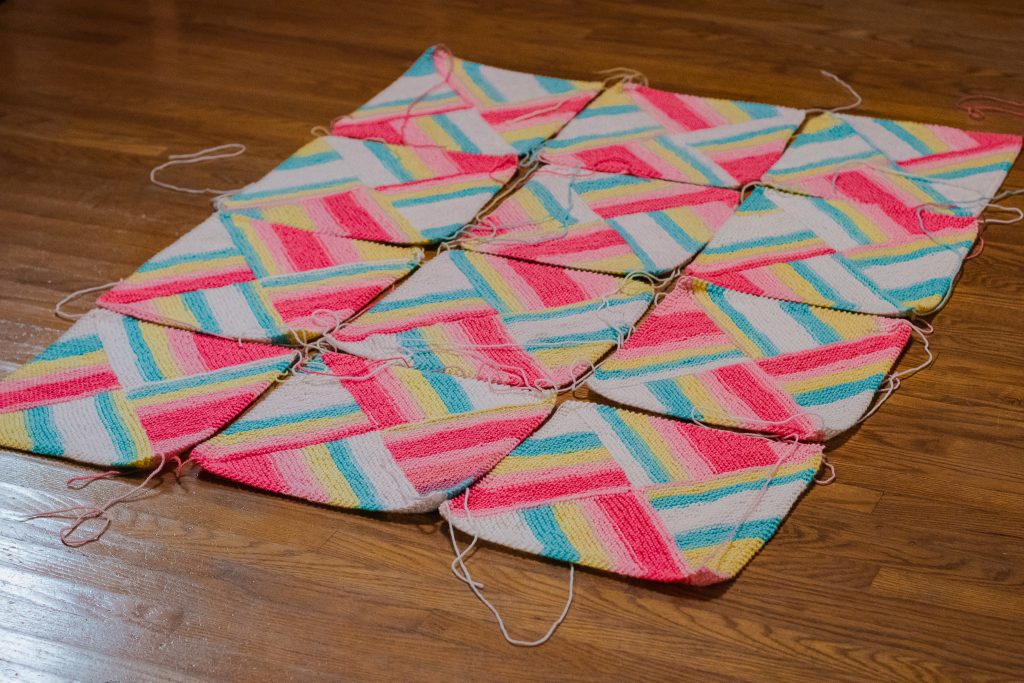
The knit stitch is the star of the show in this playful garter stitch blanket. The Dreamhouse Blanket uses the natural color changes of self-striping yarn to create a one-of-a-kind throw. Four triangles make up each square, and 12 identical squares come together to create this beautifully artsy blanket.
Materials
Yarn: Light/DK—Lion Brand Ice Cream Big Scoop in Tutti Frutti
- 100% Acrylic
- 1117 yds (1022 m) per 10 oz (284 g) skein
- Find this yarn on lionbrand.com or visit yarnsub.com to find comparable substitutes.
Yardage Required: 2 skeins or 2000 yds/1829 m
If substituting Lion Brand Ice Cream, choose any similar, category #3, light weight yarn that matches gauge. Always swatch before beginning to ensure you are happy with the resulting fabric.
Notions: Tapestry needle
Needles: Size U.S. 8 (5 mm) or size needed to obtain gauge. You will only have 40 sts on your needle at any given time, so most needle lengths/cord lengths should be fine.
Finished Measurements
Finished blanket measures approximately 36” (91 cm) wide by 48” (122 cm) tall.
Each square measures approximately 12” (30 cm) by 12” (30 cm).
Gauge
4 x 4″ (10 x 10 cm) = 19 sts and 37 rows in garter stitch
Pattern Notes
Skill Level: Easy
Stitch Counts: Stitch counts are listed after each row in italics. If no stitch count is given, there has been no change since the previous row.
Construction: This blanket is made up of 12 identical squares knit individually and seamed together at the end. Each square is made of 4 triangles – the last 3 triangles knit onto the edge of the previous triangle, with no seaming involved while knitting each square.
RS/WS Rows: There is a RS (even numbered rows) and WS (odd numbered rows) to each square. Pay close attention to which row instructs you to place a marker – this denotes the RS of your work and will be referenced throughout the knitting of your square.
Supplementary Photos: There are 12 helpful tutorial photos included in this pattern. They are formatted on separate pages so you can print the text only, if preferred.
Abbreviations
K: knit
K2tog: knit 2 stitches together (right-slanting decrease)
- Insert your right needle into the next 2 sts knitwise, treating them as 1, and knitting them together
rem: remaining
rep: repeat
RS: right side
s1kw: slip 1 stitch knitwise
psso: pass slipped stitch over
- With your left needle, pass your slipped stitch over the stitch you just knit (as if you are binding off one stitch)
st(s): stitch(es)
WS: wrong side
Customization Ideas To Try!
- Use this pattern as a blank canvas to create your own colorwork blanket using your desired palette, changing colors wherever you like, playing around with the thickness of each stripe.
- This pattern would also be great for a scrappy project, using up any DK weight yarns from your stash, rather than using a self-striping yarn.
- This blanket pattern will work in other yarn weights, too. Simply follow the pattern with your chosen yarn/hook combination to see how large one square is. Then, decide how many total squares you will need based on your desired blanket size.
Pattern
The text for the pattern is included below, and the 12 supplementary photos are included in this file here. Happy knitting!
SQUARE (MAKE 12)
Triangle 1
Cast on 40 sts using the long-tail cast-on.
Row 1 (WS): K across.
Row 2 (RS): K to last 3 sts, k2tog, K1. [39 sts]
Place a stitch marker somewhere into this row to help distinguish the RS row.
Rep Rows 1 and 2 until you have completed Row 74 with 3 sts in this RS row.
Row 75: K across
Row 76: K2tog, K1. [2 sts]
Row 77: K across.
Row 78: K2tog. [1 st]
Fasten off, leaving 24” (61 cm) tail.
Triangle 2
With RS facing and the cast on row horizontal along the bottom edge, pick up and knit 40 sts along the vertical edge. See photos A, B, and C. You may choose to pick up the garter bumps or the sts between them – it is up to you. However you choose to do it, be consistent for the entirety of your blanket.
Rep all instructions for Row 1-78 to complete your second triangle, leaving a 24” (61 cm) tail.
Triangle 3
With the RS facing, pick up and knit 40 sts across the inner edge of Triangle 2 as shown. See photos D and E.
Rep all instructions for Row 1-78 to complete your third triangle, leaving a 24” (61 cm) tail.
Triangle 4
You will create this triangle in the same way while also attaching it to the cast-on edge of Triangle 1.
With the RS facing, pick up and knit 40 sts across the inner edge of Triangle 3. See photo F.
Row 1 (WS): K across to last st, s1kw, knit into the first cast-on stitch along the edge of Triangle 1, psso. See photo G.
(On each subsequent WS row, you will knit into the next cast-on stitch along the edge of Triangle 1.)
Row 2 (RS): K to last 3 sts, k2tog, K1. [39 sts]
Rep Rows 1 and 2 until you have completed Row 74 with 3 sts in this RS row.
Row 75: K2, s1kw, knit into the next cast-on stitch, psso.
Row 76: K2tog, K1. [2 sts]
Row 77: K1, s1kw, knit into the next cast-on stitch, psso.
Row 78: K2tog. [1 st]
Fasten off, leaving a 24” (61 cm) tail.
Your square is now completed!
Weaving In Your Ends
Weave in all ends in the center of each square.
One of the corners of your square will have two ends. Tie these two ends together in a double knot to secure them, then weave in the shortest of these two ends. (Make sure your ends are woven in on the WS of the fabric so they are not visible from the RS.)
Each square should now have four ends remaining: one in each corner. I recommend to keep these four ends on each of your 12 squares to give the most freedom in placement of your squares. These ends will be used to seam your squares together. Once your blanket is all seamed together, then you will weave in the remaining ends.
Blocking and Arranging Your Squares
Block your squares. Arrange your 12 squares as desired.
See photo H.
Seaming Your Squares
Using the mattress stitch with the WS facing you, seam your squares together so that you have three columns of four squares. Use the long tails that remain on the corners of each of your squares when seaming. Make sure these seams are not too tight; you want them to have some stretch to them.
See photos I, J, and K.
Seaming Your Columns
Using the mattress stitch with the WS facing you, seam your columns together. Use the remaining long tails when seaming. Make sure these seams are not too tight; you want them to have some stretch to them.
See photo L.
Block your blanket to the given dimensions.
#DreamhouseBlanket
Thanks so much for reading!
Shop the full Dreamhouse Blanket knit kit here (comes with all yarn required + free copy of the PDF pattern)!
Find the pattern in these places:
On Ravelry
On Etsy
On My website
For free in the Lion Brand kit!
x
Janine
You can find my full print book, Modern Crochet Sweaters: 20 Chic Designs For Everyday Wear on the shelves of all major retailers or see purchasing options here!
For exclusive discounts on all new patterns, join the Knits ‘N Knots newsletter list here!
You May Also Like