

Hi friends!
Today I’m sharing my Spring Valley Bandeau pattern with you! It’s a free pattern written in a tutorial-style so you can make it for your exact body measurements.
This post contains affiliate links. This means, should you make a purchase, I will receive a small portion of the sale at no extra cost to you. All opinions are my own. View my Privacy + Disclosures Policy here. This post is sponsored by We Crochet.
Each month I share a free pattern with you in collaboration with WeCrochet. Last month was the Ripple Plant Rug in case you missed it!
If you want to be notified of all new pattern releases (and get exclusive discounts on all new paid patterns), sign up below!

About
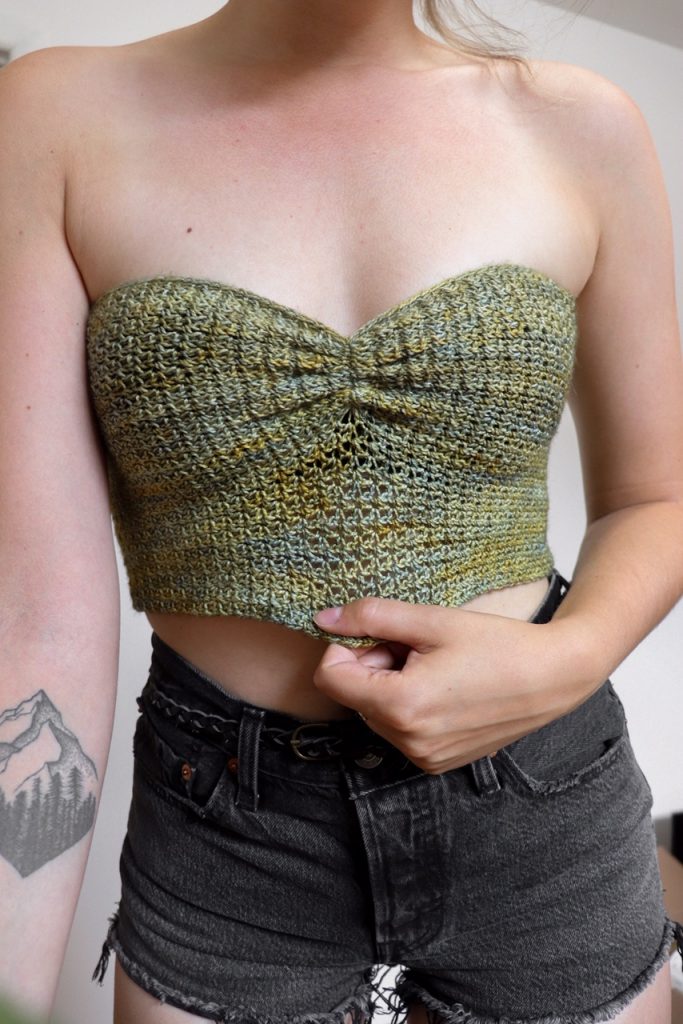
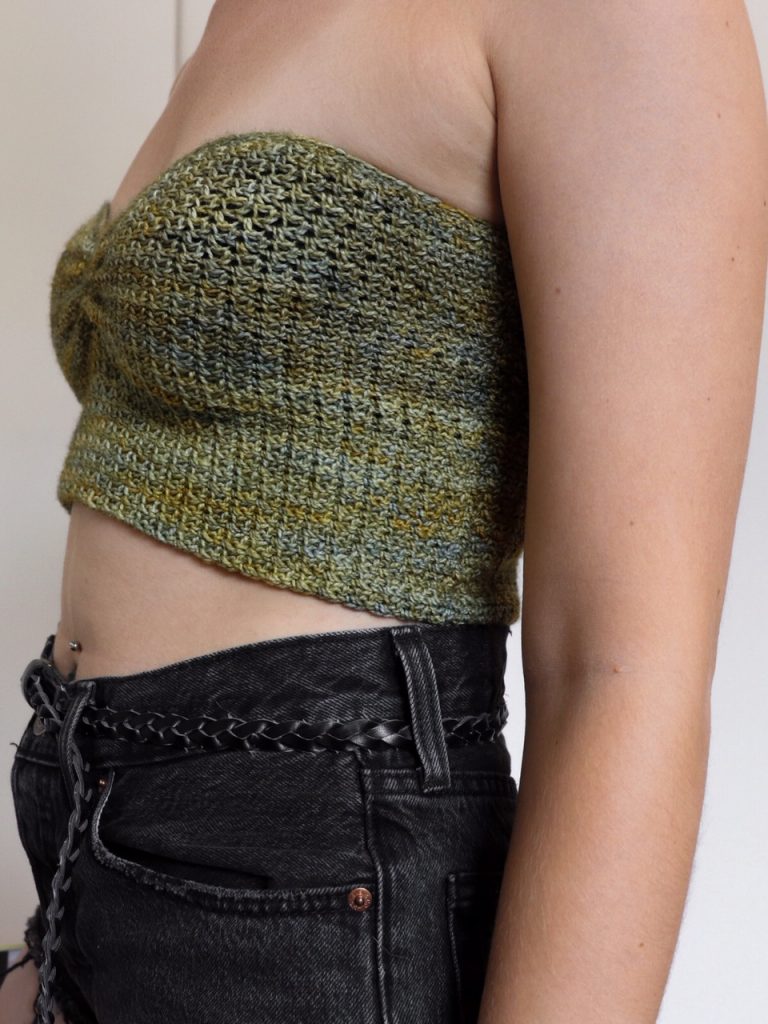
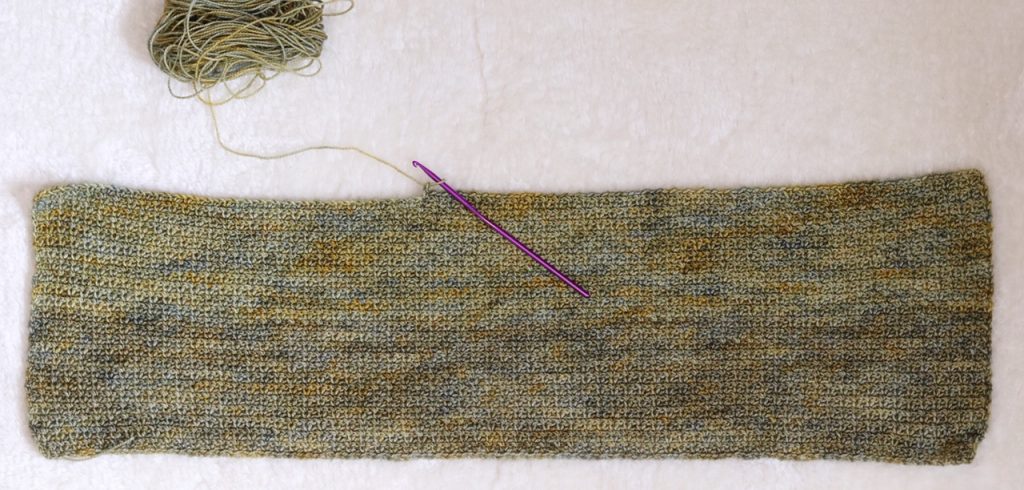
The Spring Valley Bandeau is such an easy top to make. You can use this as a template to make your own bandeau tops using any stitch pattern. It’s honestly as simple as making a rectangle.. if you can crochet a rectangle, you can make this top. I worked it in a stitch pattern that alternates sc and ch, however feel free to replace this stitch pattern with literally any stitch pattern you like. I used WeCrochet Hawthorne for this top, but you can replace this with any fingering weight yarn (or any other weight of yarn if you prefer)! This piece is very customizable and you can adjust the length, the width, the stitch pattern, add straps, and add any amount of ruching you like.
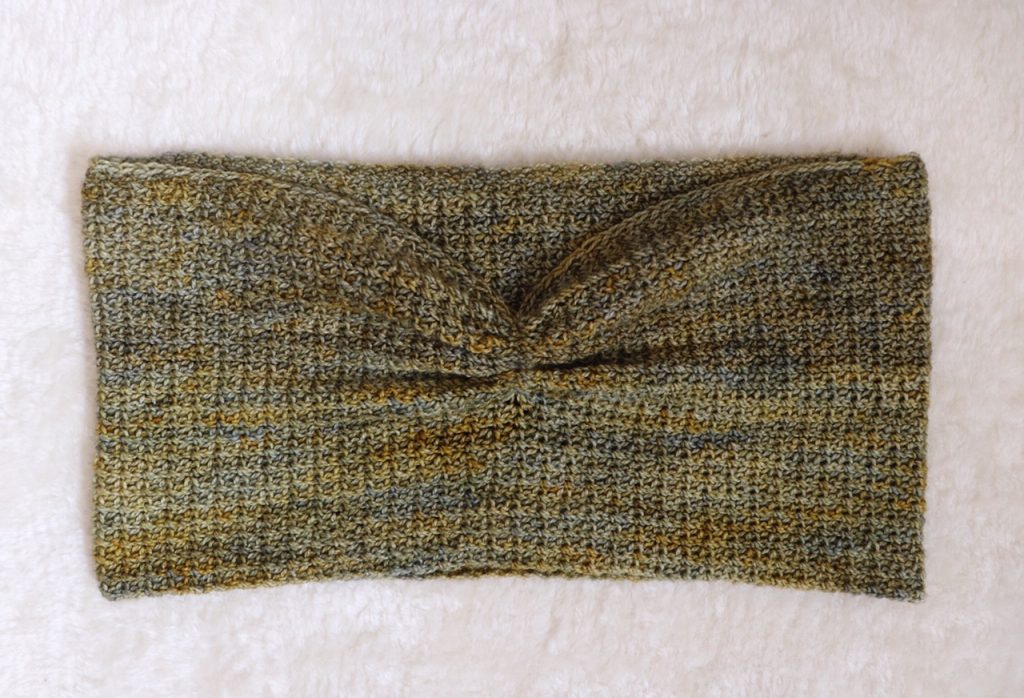
Ruching
The ruching (or the pinching) in the front of the top is as simple as weaving a strand of yarn in a U-shape and pulling tight. That’s it!
Sizing
This is a simple tutorial to make a bandeau for any body. No matter your shape or size, you can customize it to fit your exact measurements.
The sample shown is worn on a 34″ bust and measures 29″ in circumference, for a top that is worn with approx. 5″ of negative ease. The negative ease is crucial when making this top, otherwise it will fall down your body as soon as you put it on. This may seem like a *lot* of negative ease, but this is what keeps it in place during wear. You want it to be snug to your body, but not restricting. You can try with less negative ease, for example 3-4″ of negative ease, but it’s better to have your finished bandeau to be on the smaller side than have it too big. If you work it too small, you can always work a few rows of single crochet to the edge before joining into a tube to add some more fabric. You cannot, however, take fabric away if you make it too big.
The pattern below illustrates all of this and also how to add very simple straps if you feel you need extra support.
How to Wear
This top can be worn braless, with bra, or with pasties – whatever you prefer. Just note that if you plan on wearing a bra, take your bust measurement while wearing your bra. If you plan on wearing it with just pasties, make sure you take your bust measurement braless to get an appropriate fit for your body.
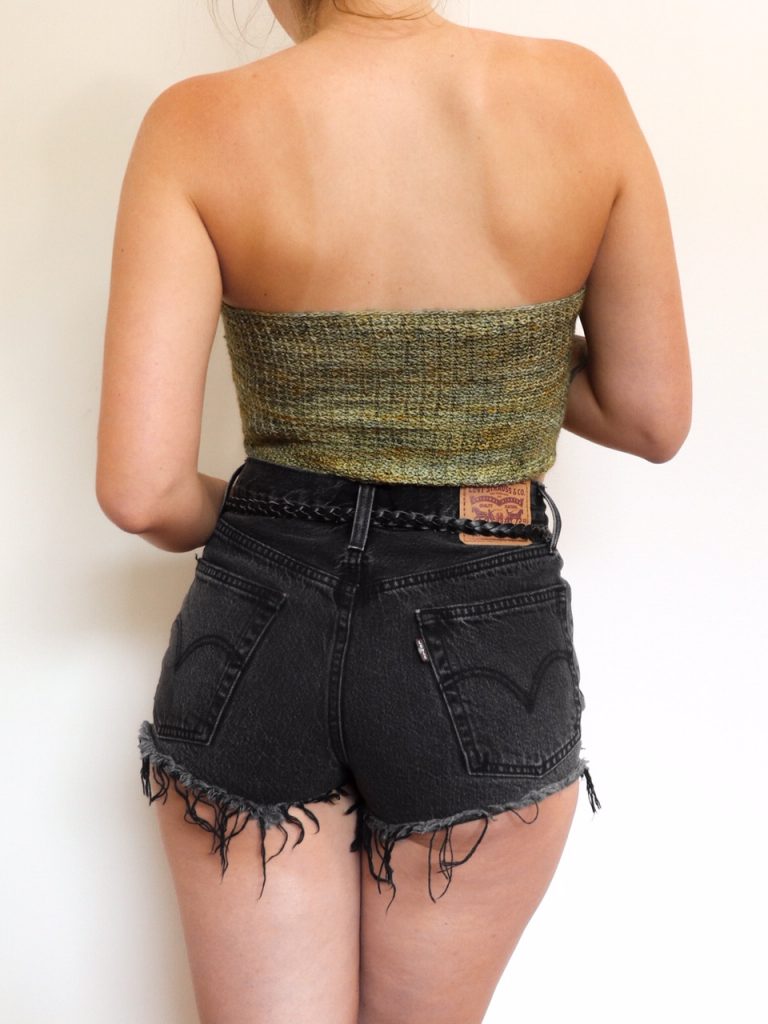
Construction
This top is worked in a simple rectangle and gets seamed together into a tube at the end. The reason I chose to seam it vs. work in the round is so that you have another chance to adjust it once you’re finished. You can also work it in a spiral or in joined rounds, but this eliminates any opportunity to adjust it at the end. If it’s too tight, you won’t have a chance to add more fabric along the edges just in case. But, if you are comfortable with this and are quite confident you can achieve the proper measurement, go ahead and work in a spiral or in joined rounds if you prefer this.
Once you have the tube finished, you will take a scrap piece of yarn and weave the yarn in a U-shape wherever you want the ruching.
Yardage
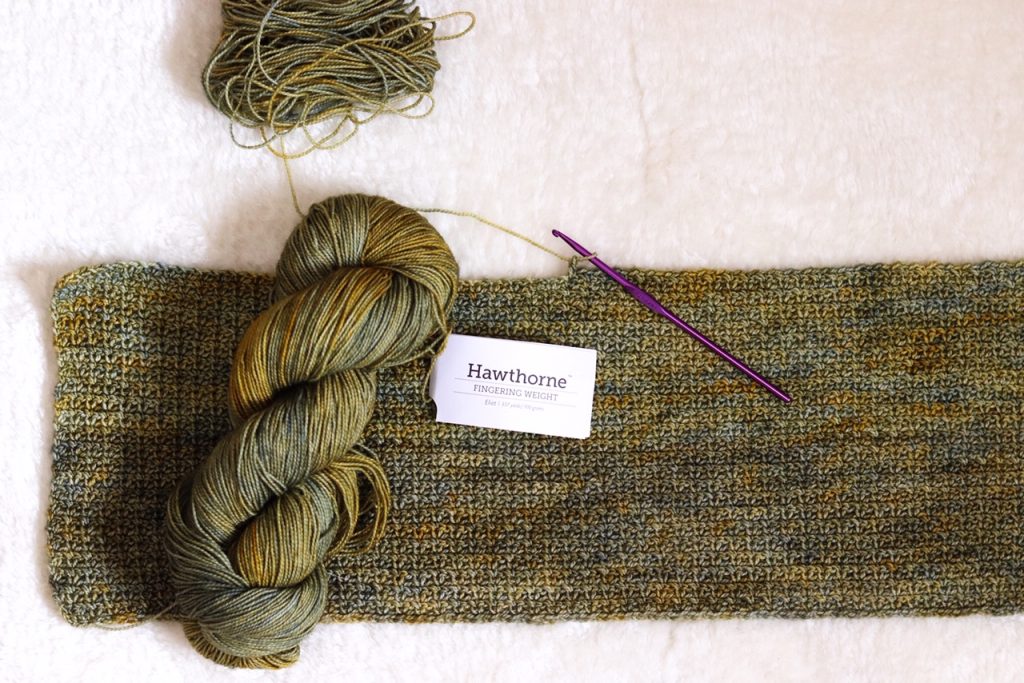
Yarn: WeCrochet/Knit Picks Hawthorne in Eliot
XS, S, M: 1 hank WeCrochet Hawthorne (300-500yds)
L, XL, 2X: 2 hanks WeCrochet Hawthorne (450-750)
3X, 4X, 5X: 3 hanks WeCrochet Hawthorne (900-1000yds)
I use the CYC Sizing Standards when calculating yardage. Find your size here.
Since this design is a tutorial-style that you will make to your exact measurements, the yardage provided is only an estimate. The total yardage depends not only on your bust circumference, but your desired length. You can make this cropped, ending just below the bust, or full-length for more coverage. My top shown used 76g or 275yds. This equates to about 3/4 of one skein of the recommended Hawthorne yarn.
I usually wear a size small, and my top is worked quite short.
Materials
- 1 (1, 1, 2, 2) (2, 3, 3, 3) hanks* of Hawthorne fingering for sizes XS (S M, L, XL) (2X, 3X, 4X, 5X)
- *rough estimate
- read my Hawthorne yarn review here!
- 3.75mm crochet hook
- 3 stitch markers (or scrap yarn)
- yarn needle
Gauge
4″=20sts and 26 rows in stitch pattern
For gauge swatch, ch 30 and follow instructions for Row 1-28. Measure the inside sts of your swatch.
Note: gauge for this isn’t crucial. You can work as tightly or as loosely as you like. What matters is that your foundation chain is 3-5″ shorter than your bust measurement. Just be aware that the looser your gauge, the more “hole-y”. If you want a solid fabric, aim for a tighter gauge.
PATTERN
Body
Measure the fullest part of your bust with a measuring tape. If you plan to wear a bra with this top, wear a bra while you measure yourself.
Chain an even number of chains that equals approx. 3-5″ shorter than your bust measurement.
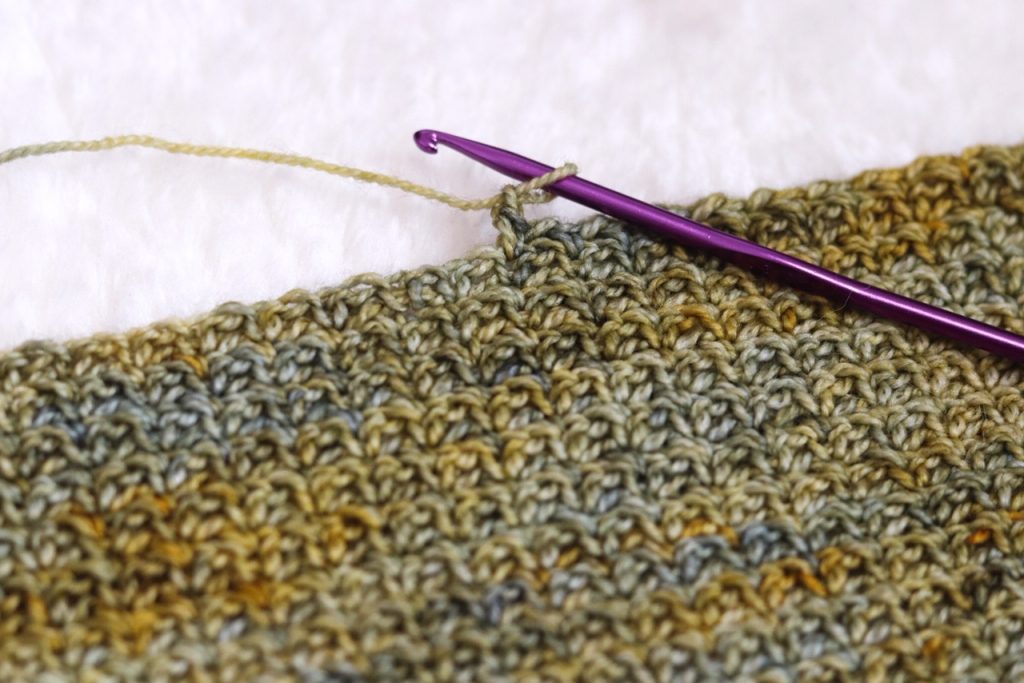
Row 1: Sc in 2nd ch from hook, *ch 1, sk next ch, sc in next ch; rep from * to end of row, turn.
Row 2: Ch 1, sc in first sc, *ch 1, sk next ch-sp, sc in next sc; rep from * to end of row, turn.
Rep Row 2 to desired height.
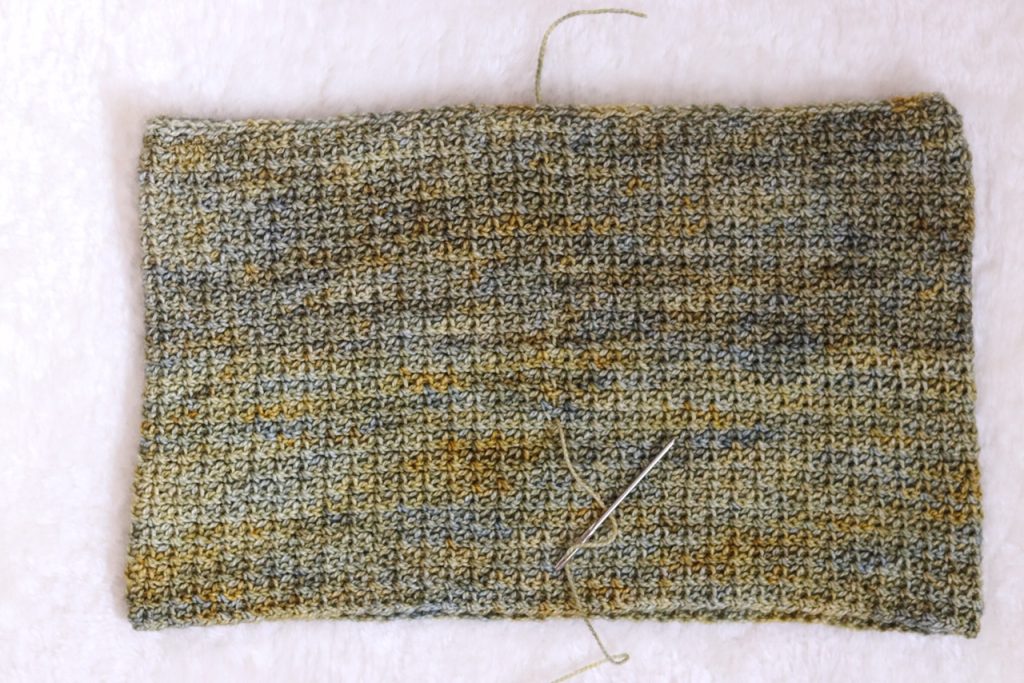
Seaming
Block your rectangle to get straight edges and even out any wonky stitches.
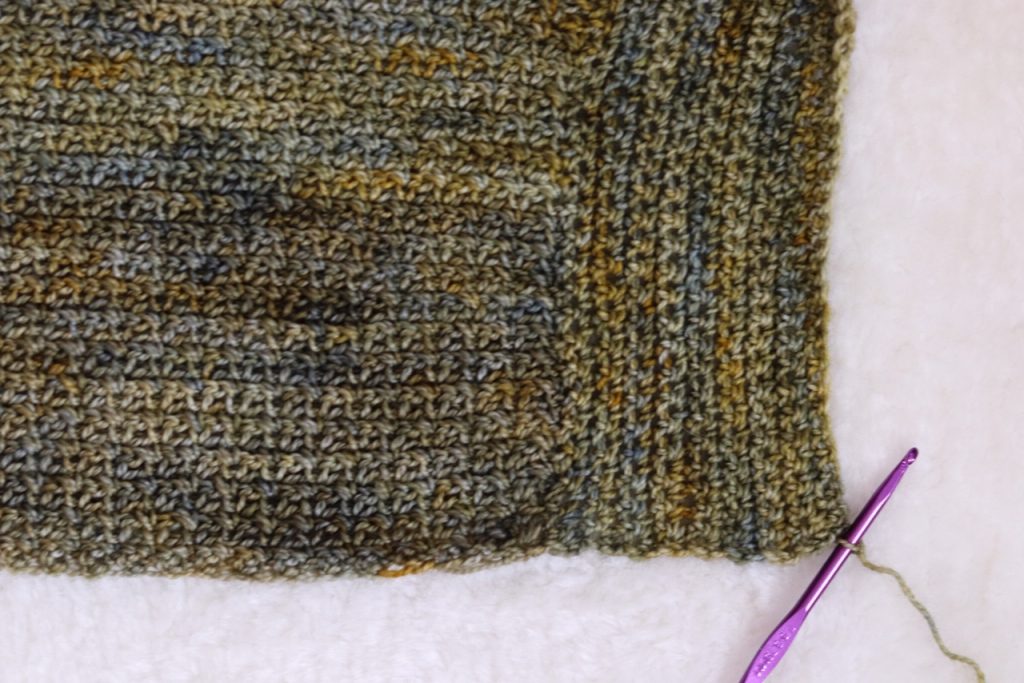
Once you’re satisfied with the height, wrap this rectangle around your body. It should be able to come together so that both short edges touch while you lightly pull it. It may seam tight as you’re holding it up at this point, but once it’s seamed together it should fit snugly. I thought mine might be too tight, so I added some edging along one of the short edges to add fabric but it ended up being too wide in the end and I ripped it all out.
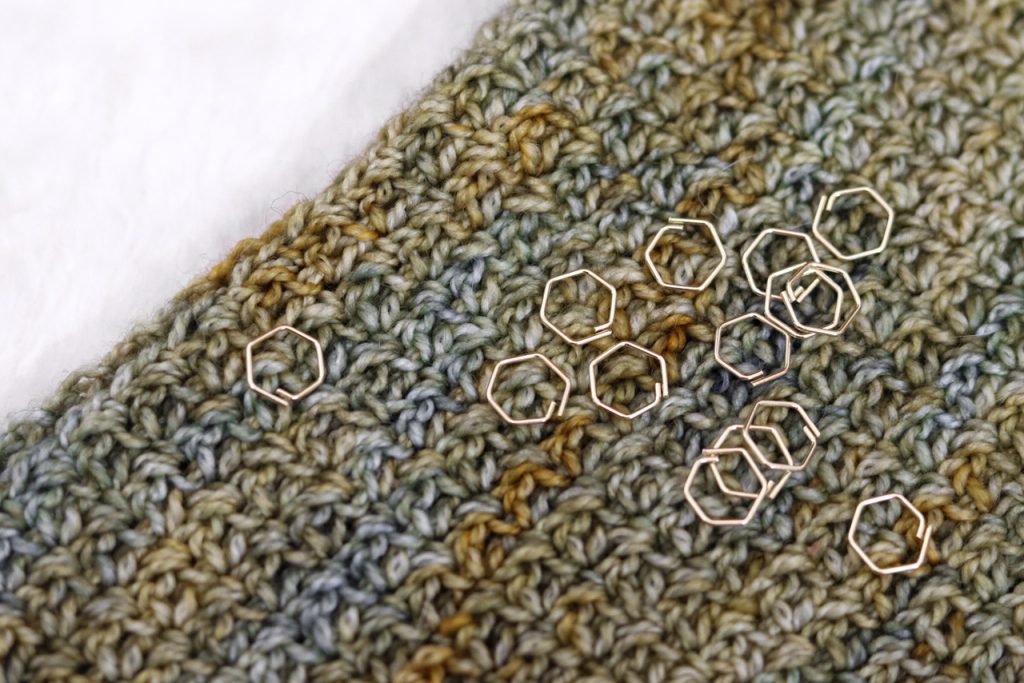
If yours seems too tight, work a few rows of single crochet along the short edge of your work until you feel you’ve got the right amount of fabric for you (see below).
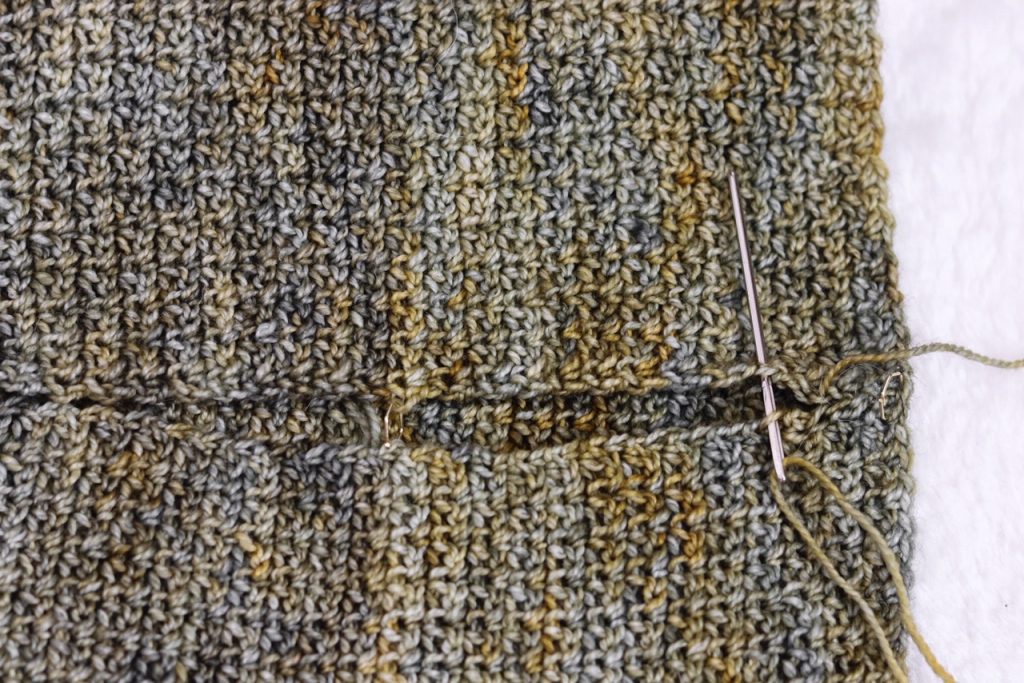
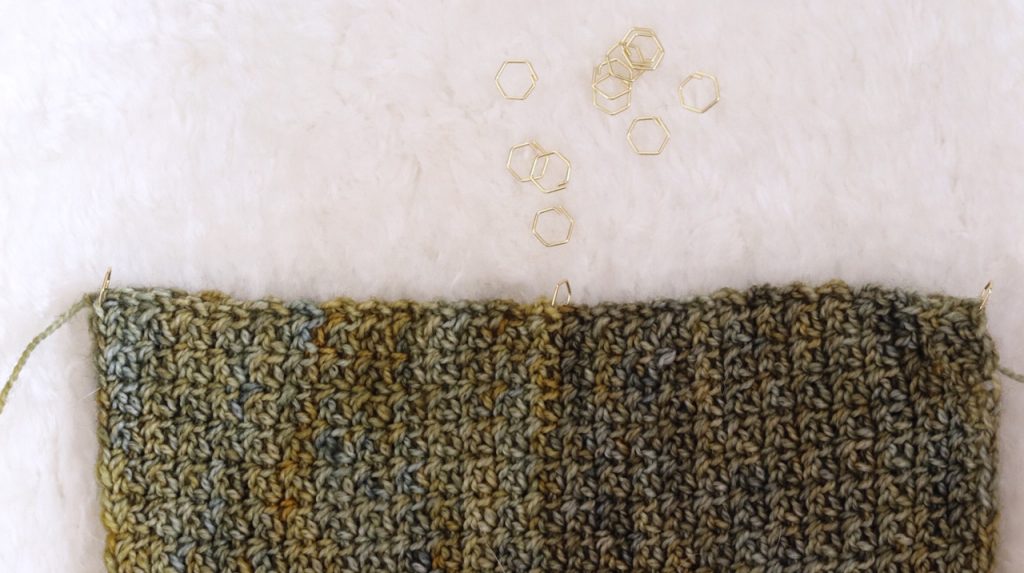
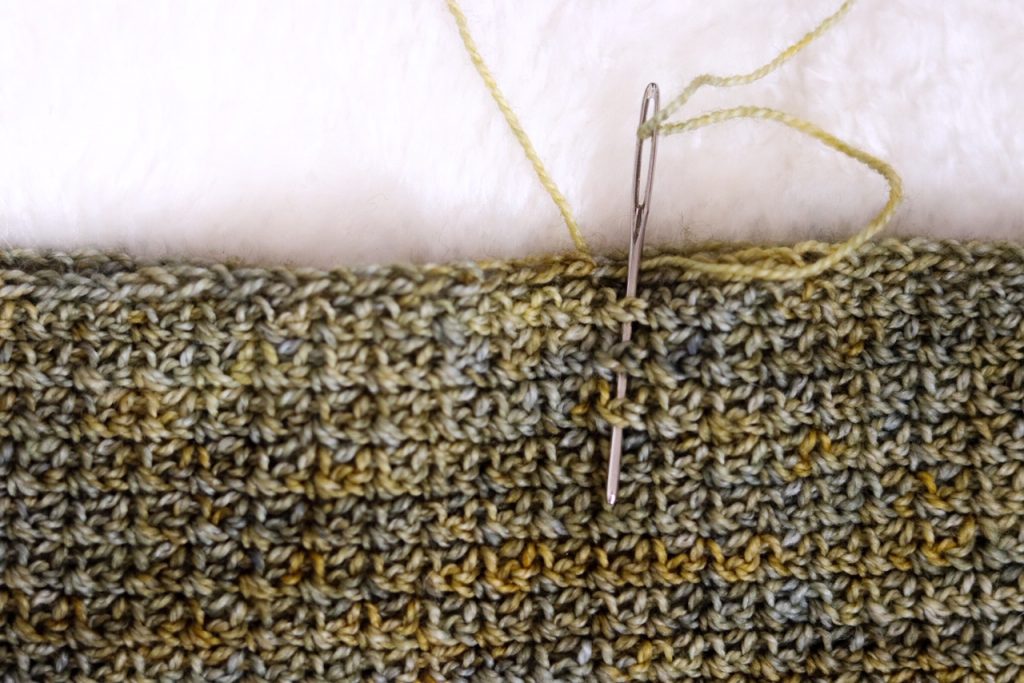
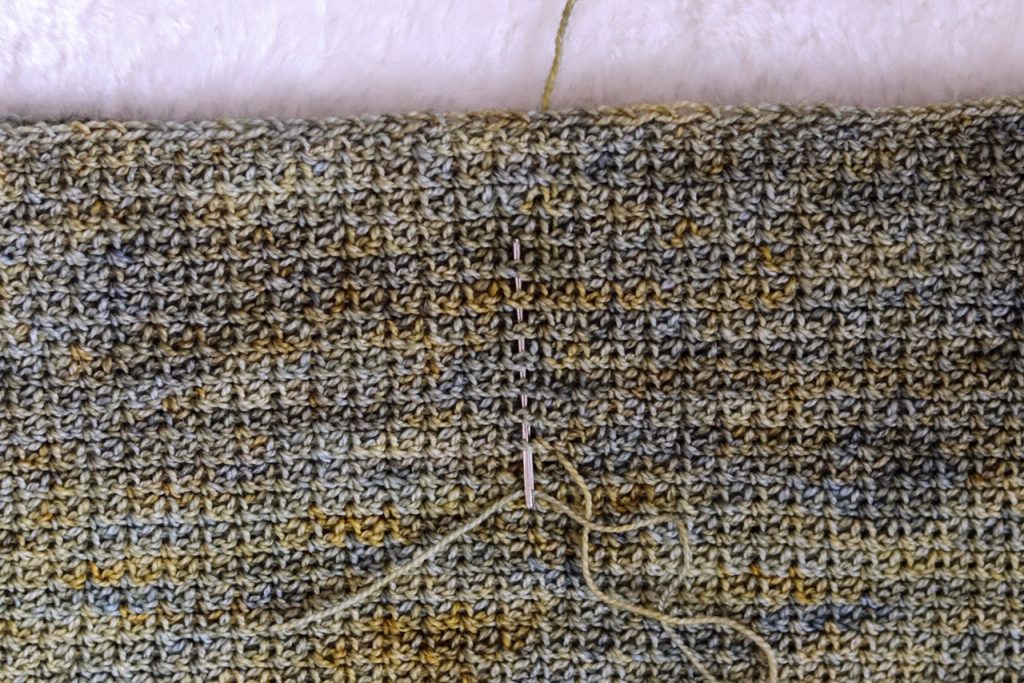
Once you’ve got the correct circumference for your bust, use your yarn needle to whip stitch (or use any seaming method of your choice) the short edges together to form a tube.
When seaming 2 identical edges together, I like to use stitch markers at the two ends as well as the center to make sure that my edges are aligned as I seam (see below).
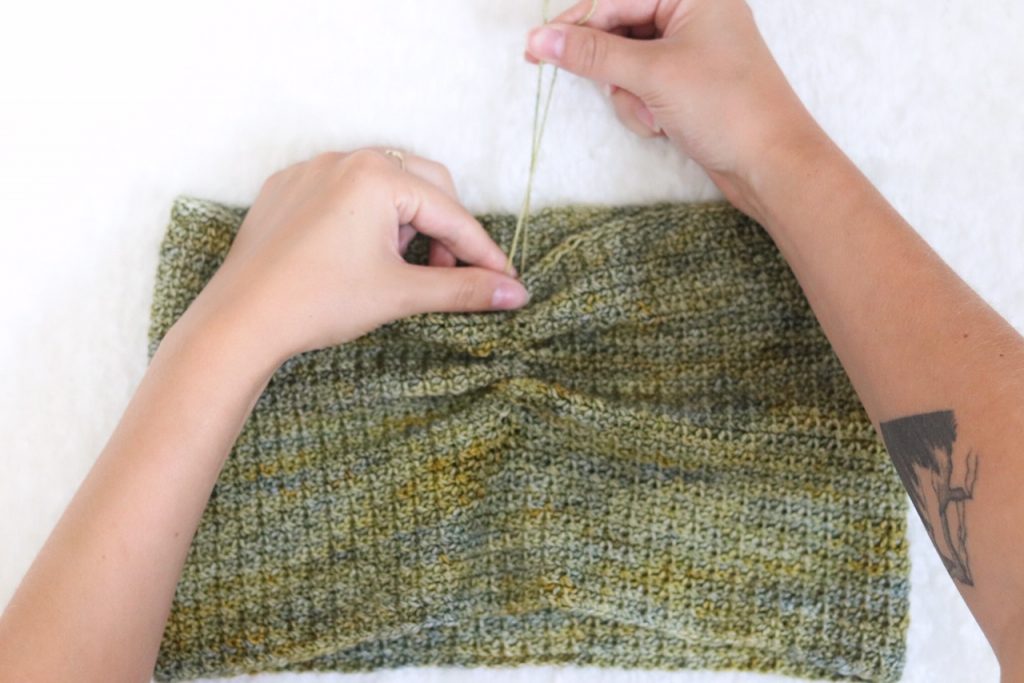
Rouching
The last step is to create the ruching, or the gathering that you see in the center-front. Choose the spot on your bandeau that you would like the ruching. I chose to have my seam at the side rather than in the back, but you can do whichever you prefer.
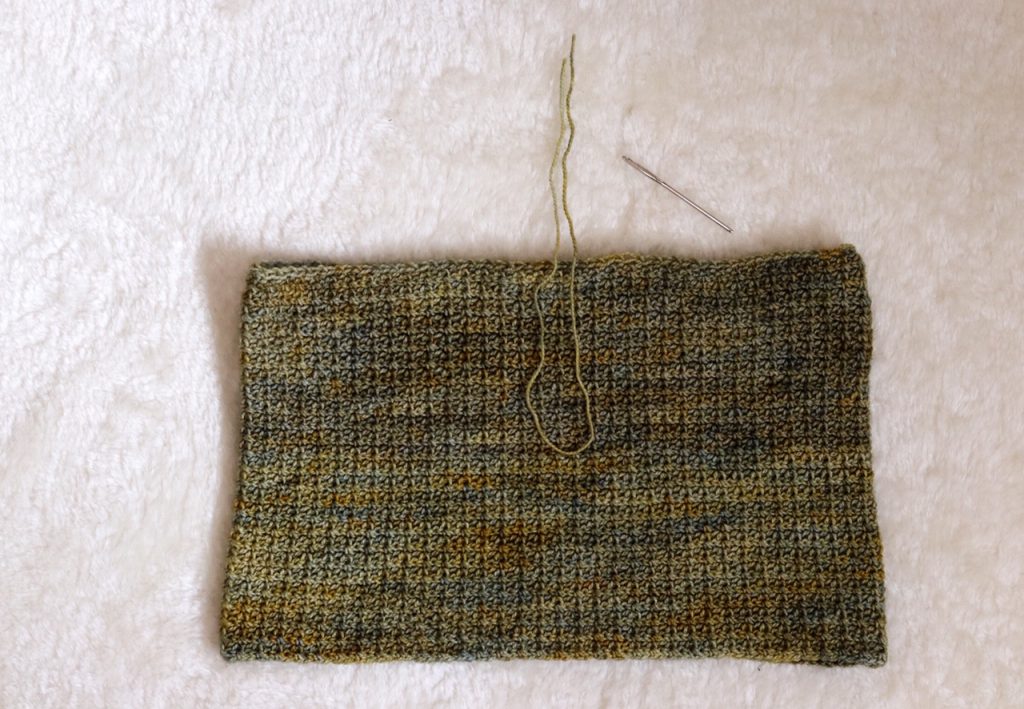
To do this: (helpful photos below) Simply take a scrap piece of yarn (approx twice the height of your top) and thread your yarn needle. Starting at the top edge of your bandeau, weave this scrap yarn between each row until you reach the depth at which you want the ruching to stop. Next, you will turn to begin working in the opposite direction to create a U-shape. Continue weaving between each row until reaching your starting point. Pull tight, tie a double knot and weave ends.
You’re done!
Note: At this point, if you feel like you need extra support, try your top on, and use stitch markers to mark the places on your top that you think straps would look bests. Attach yarn with sl st, and make a chain long enough to reach over your shoulder and reach the back of your bandeau. Slip stitch into the back of your bandeau and repeat for a second strap on the opposite side. You will have to try your top on a few times as you do this to make sure the strap placement is exactly where you like it. You can also work back into each chain to work thicker straps if you prefer. There are no rules here. Have fun with it!
Find more free patterns here.
Shop paid patterns on Ravelry here. (Use code PATTERN10 for 10% off all patterns!)
I can’t wait to see your WIPs! Make sure to tag me @knitsnknotswpg and use the pattern hashtag #SpringValleyBandeau so that everyone can see your projects!
Happy crocheting,
xx
Janine
You May Also Like


Miss Mahtab
Useful and creative thoughts. thanks for the idea. this is an amazing crochet giving an attractive look. diysncrafty.com
07 . Aug . 2020