
Hey guys,
I’m assuming that if you’re here navigating this blog, you’re probably familiar with reading and following patterns. Maybe you’ve even designed your own patterns! Well, whether you’re already publishing your own patterns or whether you’re wanting to start, I have some tips for you that may make your writing process a little easier.
Let me start by saying I have been “casually” “writing patterns” since 2017. Why the two quotes?? Well “casually” because it was like 2 a year, and they sucked, and “writing patterns” because they were either only written for one size (cringe, I know), or they were just not good. Or both. Definitely both. If you were one of those sweet souls who purchased from me in the early days.. bless you.
Fast forward to today, I am now almost done transitioning from a finished product business to a totally digital business and it’s exactly where I need to be right now. I love it. To be honest, I knew this was where my business was headed, but I didn’t feel like I was ready or experienced enough or knowledgeable enough to take designing full time (opposed to finished knits), and I was right. I think it would have been a mistake to do that earlier on, when I really didn’t know what I was doing or if I was any good at it. It’s all about timing. Well folks, now I feel good at it. I feel I’ve taken the past year and a bit and learned what I could about writing patterns and I now feel comfortable enough to put my designs out there and feel they are worthy of your $5-7 dollars. Lol.
I also want to say, I’m not TELLING you to do any of this. I’m just sharing some helpful nuggets I’ve picked up along the way in hopes that they help somebody! You do you!
I’ve slowly become more comfortable with writing out my patterns and even made the decision to hire a tech editor. This was the smartest decision I’ve ever made for my business. Do I need to shout that again for the people in the back?! The SMARTEST decision I ever made for my business. I’m not even exaggerating. There’s no more questioning if my pattern is ready, or if it’s riddled with typos, or if the math makes sense. The tech editor checks all your math based on your gauge, compares it to whatever standards you are using (I use the CYC), verifies that your repeats work, makes sure you have all the necessary abbreviations in your list, and so much more. I use Emily from Fiat Fiber Arts, by the way. If you need a crochet technical editor, she’s great. I also have just starting using Melissa from That Metzbower Girl, and she does my grading and I will get her to edit my knit patterns as well. She does both knit and crochet tech editing and grading. Both have been amazing and I recommend!
So what have they taught me?
1. Is your gauge REALLY correct?
This was me: Makes a sweater, opens blank pattern document, needs to fill in gauge, takes measuring tape, measures over 4″, writes it down, never refers back to it again. Measures different parts of sweater to put in chart. Done.
There are 2 things I was doing wrong here. 1. Never comparing my gauge to the measurements I wrote down; 2. Measuring gauge over such a small number of stitches.
For example, let’s say I wrote my gauge down as 4″ = 9 sts x 8 rows, because when I put the measuring tape over my work and measured 4″, it looked about 9 sts.
Let’s say I need to measure bust, and I take my tape measure and measure around my sweater and find it to be a 42″ bust. There are 105 stitches in the bust area. These are facts.
This part is correct. Now, what you need to do (or what your tech editors will do) is compare that to the stitch count.
Let’s compare it to the gauge we established in the beginning:
If 4″ = 9 sts, then 42″ = x
x = (42″ * 9 sts)/4″ = 94.5 sts
Only 94.5 sts? But how? We actually have 105 sts?
There is a discrepancy between our actual measurements and the gauge we established in the beginning. The problem is that we only measured the gauge over 4″. But, gauge is always written over 4 inches, you say! Yes, it is. But to get the most accurate number, we need the largest sample size possible! What we should have done to get a more accurate gauge is measured over a greater number of stitches.
For example, the bust has 105 stitches and measures 42″. This much, we know. This is what we can use to figure out what the stitch count is for a 4″ width.
Gauge: If 42″ = 105 sts, then 4″ = x
x = (4″ * 105 sts)/42 sts
x = 10 sts.
4″ = 10 sts
This is why we need to measure over more stitches to achieve a true gauge. It doesn’t have to be around a bust, because that is harder to measure. But just measure over more stitches. This is especially important when grading for other sizes, because the gauge is what is used to figure out how many stitches are required to achieve certain measurements. In this case, our bust was off by 10 stitches, which is a lot! And if we were grading for a size larger, it would be off by even more stitches.
So, when you are filling out gauge in your pattern, I’ve learned that it’s reeeeeally important that your gauge measurements actually EQUALS the measurements you write down IN your pattern. It seems obvious now that I write it out, but it is so easy to overlook these details!
2. Are you physically measuring properly?
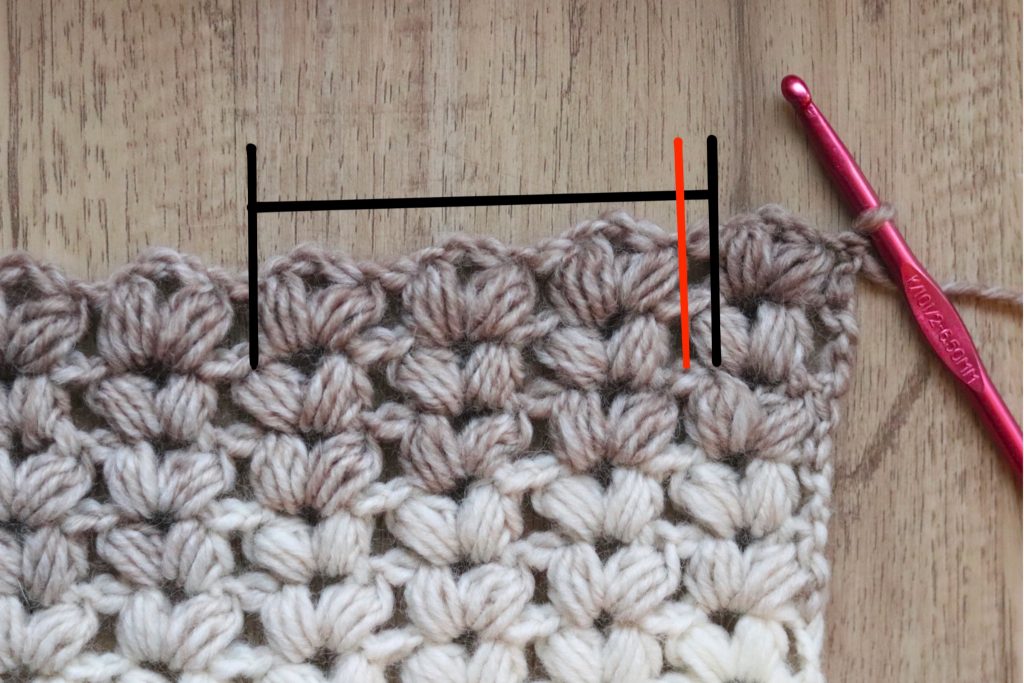
When measuring any number of stitches, you start at the beginning of a stitch, but are you measuring to the correct end point?
Take a look at my example below. In this case, I am showing how to measure 3 butterfly puff stitches. you can clearly see the starting point – it is the beginning of the puff, right where the first thick black line is. Then we measure across 1, 2, 3 puffs. The red line is NOT correct. This is where the third butterfly puff technically ends, but we need to take our measurement at the SECOND black line. If we measured to the red line, we would be missing the space that comes after the stitch. Think about it – we would not be able to multiply this [black–>red] section over and over again and keep the stitch pattern consistent. This is one way that your gauge can be off – if you’re not measuring correctly.
3. What is a tech editor and where can you find one?
A tech editor (technical editor) is somebody who analyzes your knit or crochet pattern with a fine tooth comb to catch any errors you may have missed. Think of it like a book editor or proof reader. They are taking a look at your gauge, making sure your measurements are mathematically correct based on the gauge you provided. They make sure your repeats make sense. They use spreadsheets to make sure your work is correct.
For example, in my latest pattern, I wrote, “Ch 1, *dc in next 4 sts, [dc2tog] 2 times, rep from * to last 2 sts, dc in last 2 sts, sl st into first dc to join round, turn. (22 dc)”
This was an important decrease round and each size decreased at different rates. She did the math and caught that I actually didn’t have enough stitches to decrease by the amount that I wrote, so I had to re-write that one round in order to equal the stitch count that I gave at the end. I never would have caught this myself!
She catches things like not having scBLO in the abbreviations list, even though I have scBLO written in my pattern. She catches things like having periods within the pattern row when periods are only supposed to be at the end of a row, and changes them to commas for me. She catches typos, missing *’s when I’m writing out repeats, missing brackets, missing stitch counts, and fixes phrases of mine that could be worded in a better way. She also gives me advice if she thinks I need to add some extra details to make something more clear. She even catches things like my photo being off-center, I had 2018 written in the fine print at the bottom by accident instead of 2019, etc.
I think I have had only 2 patterns that required zero changes, but these were simple patterns like a triangle scarf and a scrunchie. Otherwise, there’s always been a list of things to fix; although now that I’ve seen what type of errors she finds, I am more thoughtful when writing and able to catch most of these mistakes before they even make their way to her. That being said.. if it’s a 9-sized-graded-garment, there is almost always a list of things to fix LOL.
How to find a tech editor
The best way is through the Tech Editor Hub Facebook group. Anyone can join, and it’s where tech editors offer their services, ask tech questions to other tech editors, or where designers post that they are in need of a tech editor. This is how I found Melissa from That Metzbower Girl. I found Emily from Fiat Fiber Arts by asking designer friends of mine who they use as their tech editor. These are 2 great ways to find somebody!
Once you find someone
Send them an email asking for more info. They will tell you what they charge, what they can do for you, and ask you to send your unedited pattern to them to give you an estimate. You will then send them your pattern if you are happy with everything they’ve told you, and then they will let you know how long it will take and how much it would cost based on a quick glance of the file. You will then tell them YES go ahead, I am ok with that, if you’re happy with the estimate! Usually, for the first edit, they will not make you pay over the estimate, even if it took them longer to edit in reality. They are trying to establish a working relationship with you, so I wouldn’t worry too much about it being more expensive than the estimate. They will send you back the edited file that usually has notes or comments made on the sides of the document, and they likely would have highlighted certain rows or numbers that need further reviewing from you. You will then make the edits or ask any questions you have about what they have provided you with, and if you want, you can send them your revised version to look over once more. I do this all the time!
4. Garment Sizing – I know my size.. but how do you know what the measurements are supposed to be for OTHER sizes?
This was the most common question I received when I posted my little Instagram question box! I totally get it – it’s scary at first! If my body is a 2XL, how the heck would I know what a XS should be? If I’m a M, how do I grade for a 5XL?
The Craft Yarn Council is the industry standard for knitting and crochet. Most yarn companies, knitting magazines, and designers use these standards. There are also standards for how to write a pattern, abbreviations, and how to write repeats, things like that.
Click here to find their Standard Sizing Charts. Click here to find ALL the measurements for XS-5X body measurements in women.
I refer to this chart for each and every garment pattern. It’s basically my bible. These are the actual body measurements of a woman, not garment measurements. If you haven’t referred to this chart before, I think this is likely the piece of the puzzle that has been missing for you. Sizing isn’t about guessing what you think would fit a size 3X, guessing what looks like it could be a XS, there are standard measurements for these sizes that the industry follows so that you know you are doing it correctly. For me personally, I have a 34″ bust and under the CYC standards, that is a size small. I know that if someone is using the CYC standards in their pattern, I am a lot more confident that it will fit me properly because I know they graded it for a 34″ bust. Of course, not every body size fits perfectly into these little 2″ windows for sizing, but it is a great way to ensure consistency in sizing across various independent designers. It gets tricky for longer garments for me because I have 38″ hips which fall under a size medium! So if it’s a long sweater, I follow size medium so that it isn’t extra tight on my hips but fits my hips properly. It just goes to show that not every human body fits into these boxes, but that’s the great thing about making your own clothes – you are likely able to adjust it to fit you.
Ok, back to grading!
Here’s an example:
So, let’s say you made yourself a sweater and you are a 34″ bust (size small) and the sweater measures 36″ at the bust, this means you’ve made a sweater with 2″ of positive ease. In order to grade for size medium, you will refer to the sizing chart and see that a “medium” body has a 36-38″ bust. So this is 4″ larger than size small (34″). To grade this sweater for a medium, 38″ bust, you will need to take this number, 38″, and add the 2″ of positive ease. Your garment will need to have a 40″ bust. This will allow a woman with a 38″ bust to wear the same sweater with 2″ of positive ease, just like the size small had and it will have the same fit. Easy peasy. The only thing you need to watch for now is the sleeve length. If you are making a sweater with dropped sleeves, they will need to be slightly shorter as you increase in size because the width of the front/back panels will get increasingly wider to accommodate for larger bust sizes, but it will also eat up some of that sleeve length.
Once you know that your Medium size sweater needs to have a 40″ bust, you will use your GAUGE and figure out how many stitches you need to equal 40″, and that’s how you write your pattern.
5. What is a grader?
So, you wrote your pattern for your size, and you don’t want to grade it, eh? I feel you!
HAVE NO FEAR, there are people out there whose full time job is literally to grade knit or crochet patterns. *gasp*
I just hired my grader last month and it was one of the most amazing experiences, LOL! I sent her my pattern, and she sent back the same pattern but with 8 other sizes written in. The number of stitches, repeats, end-of-row stitch counts, she did it all. It was absolutely magical. Like, bippity-boppity-boop, here’s your entire pattern. I only use a grader if I’m on a serious time crunch or if it’s above my scope – for example, I’ve used her for some bralettes or tank tops. Usually, I like to do my own grading, but it’s nice to know there’s another option if I get stuck!
A grader is not the same as a tech editor. Although, my grader is also a tech editor. A grader uses a spreadsheet to calculate other sizes for your pattern. It is their job to grade it. Not to edit it, but to grade it. I always send my 1-size-pattern to my tech editor first, make sure it’s all good, THEN send it to my grader (2 different people). Once she grades it, I then send it back to my tech editor to review it. It would be an absolute nightmare to get something graded, then realize your initial gauge was off. You would have to get the entire pattern re-graded and pay double.
I hire 2 separate people: 1 for tech editing and 1 for grading. It’s helpful to have 2 sets of eyes on your work. If your grader finishes grading a pattern, you want someone else to look at it after. Just like you have trouble catching mistakes in your own work, a grader probably wouldn’t be able to catch any of their own mistakes because they just wrote it out for you. They already think it’s perfect. They are too close to it, and you need fresh eyes.
My grader is Melissa from That Metzbower Girl. She grades both knit and crochet patterns.
6. What pattern-writing software should I use?
This is a great question! I would say it’s preference, but I would also say that you should think about using Google Docs :p
I actually started using Word, then in 2019 I switched to PowerPoint. The benefit of using PP over Word is that you are able to place things exactly where you want them on the page rather than having to format every image and text box in Word. You can also upload your PP to Google Drive and then you can access and update it from anywhere.
Here’s why you would want to have your file available in Google Docs or Google Drive:
With Google Docs, you can log in anywhere and work from any computer. It’s super annoying to have to lug my giant laptop around because it’s the only computer that has all my files on it (I now have a desktop since writing this post!). Or I have to email them to myself so that I have them if I want to work on another computer, but then I have to email it back once I’m done so I can update my computer with the most recent file. It’s just annoying. I want to be able to work from my iPad, my phone, my laptop, our desktop, and not have to be sending files, renaming versions, etc. With Google Docs, it’s all there, anytime, anywhere, ready for you. Once you make any change, it’s done. You don’t have to worry about having multiple files saved. And if you get your patterns graded or tech edited, they can edit your Google Doc RIGHT THERE and you can even watch them do it because you can have multiple people logged on at once. Currently, with Word or PP, I have to send my version to my editor, she sends the edited version back with a new, updated name to reflect the edited file, and then by the time we finish with the back-and-forth-editing, I have like 6 files all named the same thing with different variations of editing happening. This is so annoying because I have accidentally UPLOADED THE WRONG FILE before. Just imagine – pattern release day is here and you are so excited and you end up uploading an OLD version with a ton of mistakes instead of the version you have spent weeks improving. (Hello Grand Arches Cardi!)
LOL, can you tell I am passionate about this!! I know there are probably a few other software programs you could use to write patterns, but these are the most common ones I’ve heard people using. Some of my favourite designers use PowerPoint, others use Google Docs and swear by them.
Once you get really into designing, there’s a really good chance that you will end up having your file looked at by multiple people before it’s released. Having graders and tech editors have made me realize that Google Docs would save me about 8236 headaches.
And someone asked how to turn your file into a PDF: you simply click file > export as PDF!
7. How do I calculate yardage?
THIS is the question that stumped me the most when working with multiples sizes.
If you’re trying to figure out the yardage of a hat, for example, this is how I’d do it:
Use a kitchen scale to measure the skein before you use any of the yarn, and write that weight down. Knit the hat. Measure the leftover yarn. Whatever that difference is – that’s how many grams you worked with. You could also measure the hat, since it’s a small project, of course.
Example 1
Let’s say our hat weighs 94 grams. What the heck do we do with this number? We need it in yards!!
Look at your yarn label. It will tell you the total grams and total yardage of that skein.
Let’s say it says this: 100g, 170yds.
So, now you know that 100g=170yds, and 94g=x
Solve for x.
x=(94yds * 170 yds)/100g = 159.8 or 160yds!
It’s that easy!
Example 2
Let’s say we’re trying to figure out the yardage for OTHER sizes of a sweater. To be honest, I take a rubber band and wrap my sweater into a tiny ball and measure the weight of the sweater. LOL. (I have tried weighing a basket, zero-ing my scale, then weighing the project, but this never gives me an accurate reading for some reason). Of course, you could also keep track of how many skeins you’ve used, and then measure the remainder once you’re finished, but I am never on-the-ball enough to do this apparently.
Let’s say I’ve already figured out that my sweater (size small) used 950 yds of yarn. Now I need to figure out how much yarn the size medium would use! It’s not a matter of adding one ball of yarn per size :P, although I know some people do this. Or they wait for their testers to tell them, which I suppose works, too.
BUT, did you know that you can actually calculate it?
It takes me about 45 minutes to sit down and calculate the yardage for all 9 sizes (I usually have 9 sizes for garments from XS-5X).
I open up Excel, and I use the row numbers on the side to symbolize the actual row numbers in my sweater, or I use the first column for writing the row number. Then, I look at my pattern, and see how many stitches are in the first row, and plug that into Excel, and then I do this for every row. It doesn’t take as long as you’d think. Then, once I’m done, I’m left with a whopping number for total sts.
Let’s say total sts = 22,450.
So, we know that 22,450 sts = 950 yds.
Then, figure out the total number of sts for size Medium.
Let’s say Medium has 25,650 sts. We need to figure out how many yards this is.
25,650 sts = x yds
x = (25,650 sts * 950yds)/22,450
x = 1085.4 yds or 1086 yds.
If you do it this way, I usually add an extra 15 yds to account for the ends/tails that I cut off.
I do this for every size, and then if I have testers, I make sure their numbers line up with this.
Yardage to # of skeins
You probably want to include the # of skeins you used in your pattern.
So, we just figured out that size Medium used 1086 yds, and we can write that in the materials section of our pattern. But we also want the number of skeins!
To do this, we look at the same thing we did before. In this example, the label says: 170yds per skein.
We take our yardage for size medium, which is 1086yds and we divide it by 170yds to get 6.3 skeins.
In the pattern, we would write 7 skeins, because you can’t buy 6.3 skeins. In order to have enough yarn, you’d need 7 skeins.
To be honest, I’m not sure if this is how other people do it. I have seen some similar methods, but I like to do this because then I know it’s as accurate as it could be. It’s extra work, yes, but I’m ok with it!
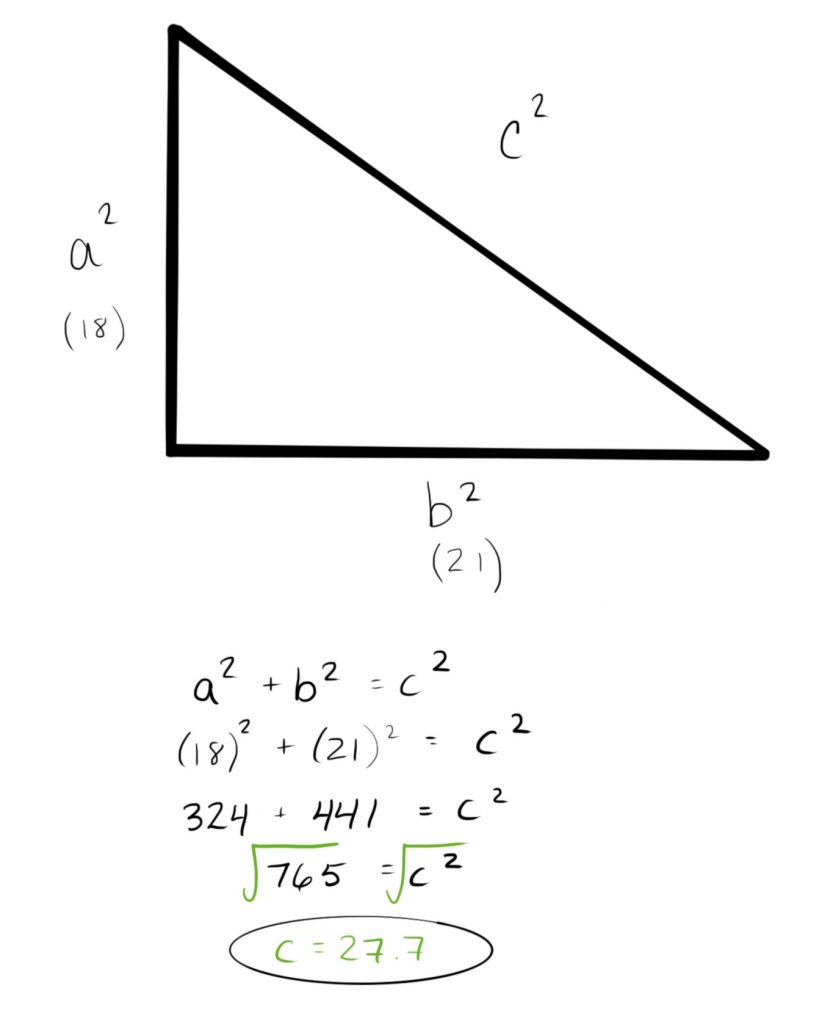
8. a² + b² = c²
I included this because it was a fun little fact I learned that comes in handy when figuring out measurements on garments or shawls!
If your shawl has a right angle (like if you’re working a shawl from the tiny corner that only increases on one side) or if you are making a raglan sweater, you can use the Pythagorean Theorem to figure out the hypotenuse (the longest side of the right angle triangle – labeled “c”)
Here’s an example of how you could measure a right angle shawl (units are irrelevant – could be inches or cm or whatever):
In this case, to check that your stitch gauge and row gauge are correct, you could measure the two sides that form the right angle, and see if your calculated “c” ends up matching your actual measurement for the long edge of your shawl.
These are a few fun things I’ve learned along the way, and I’ve still got a long ways to go in my pattern design career! I hope that you found some of this helpful, and I would love, love, LOVE it if you’d share this resource with anyone else who you think may benefit! 🙂
Pre-order my book Modern Crochet Sweaters here!
Thanks so much for reading,
Janine xo
You May Also Like
Terry
What a great article! Thank you for all of that . . . it certainly makes me appreciate even more the patterns that I buy.
06 . Oct . 2019