

Hi all!
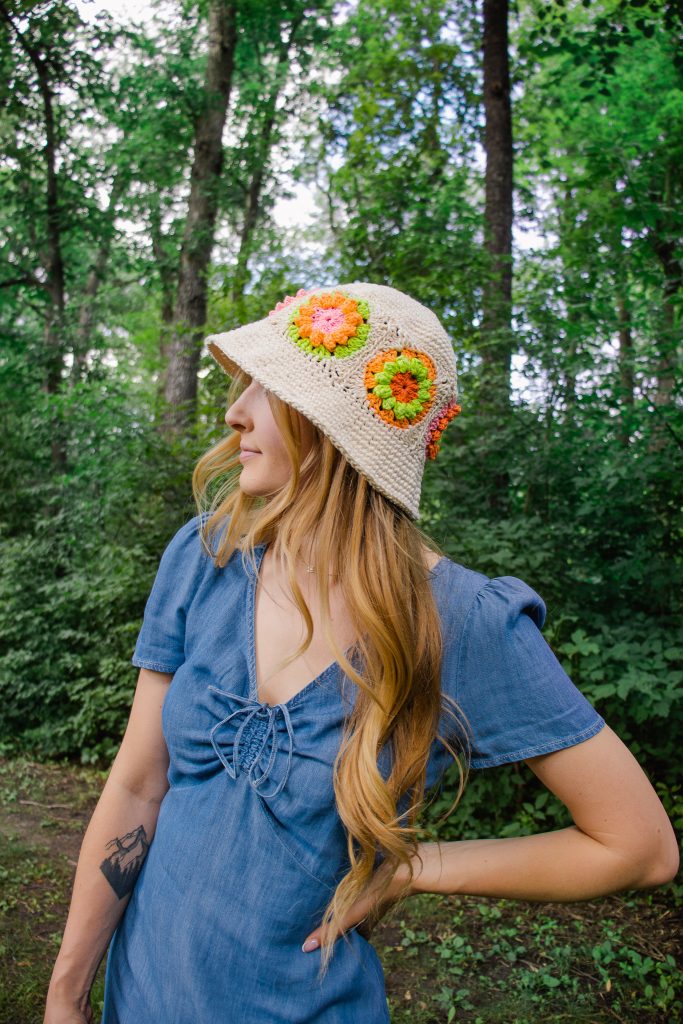
This post includes everything you need to know about the Flower Market Bucket Hat, a summery granny square hat featuring six unique squares spanning the circumference of the hat. Named “Flower Market” since picking the colors for each flower feels like picking your floral bouquet at a flower market!
Get the Lion Brand Crochet Kit here (in your desired colourways)!
Before we begin, here are some quick links for you:
- Find the PDF version on Ravelry, Etsy, and my website.
- Add your finished project to Ravelry here!
- Shop the recommended yarns, Lion Brand 24/7, here.
- Shop the full Lion Brand crochet kit here (comes with all yarn required for your size + FREE copy of the PDF pattern)!
- Shop the sister pattern: the Flower Market Baby Blanket, a join-as-you-go granny square blanket that can be found here!
- For any questions about this pattern, please email knitsnknotswpg@gmail.com and I’ll get back to you asap!
Shop my new book – Modern Crochet Sweaters: 20 Chic Designs for Everyday Wear – here!
If you want to be notified of all new pattern releases (and get exclusive discounts on all new paid patterns), sign up below!
This post contains affiliate links. This means, should you make a purchase, I will receive a small portion of the sale at no extra cost to you. All opinions are my own. View my Privacy + Disclosures Policy here.
About
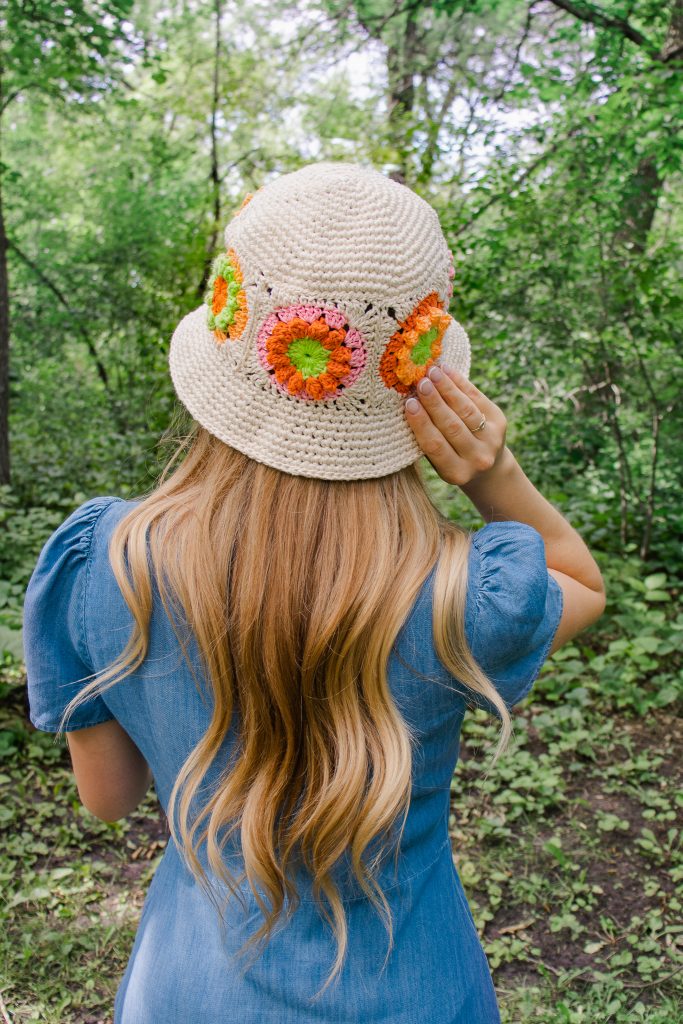
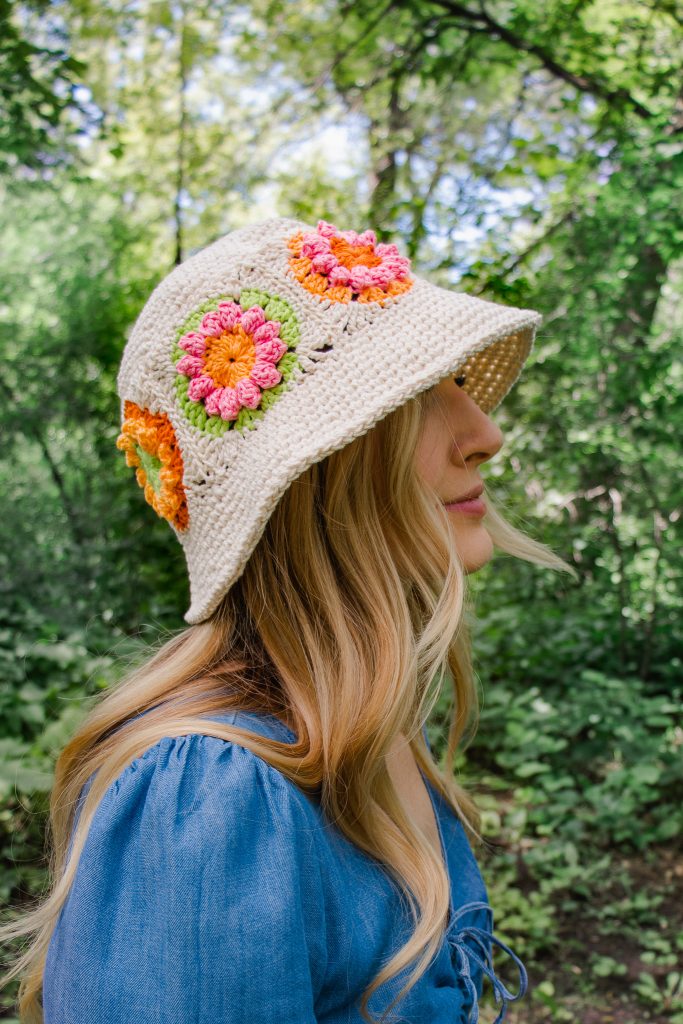
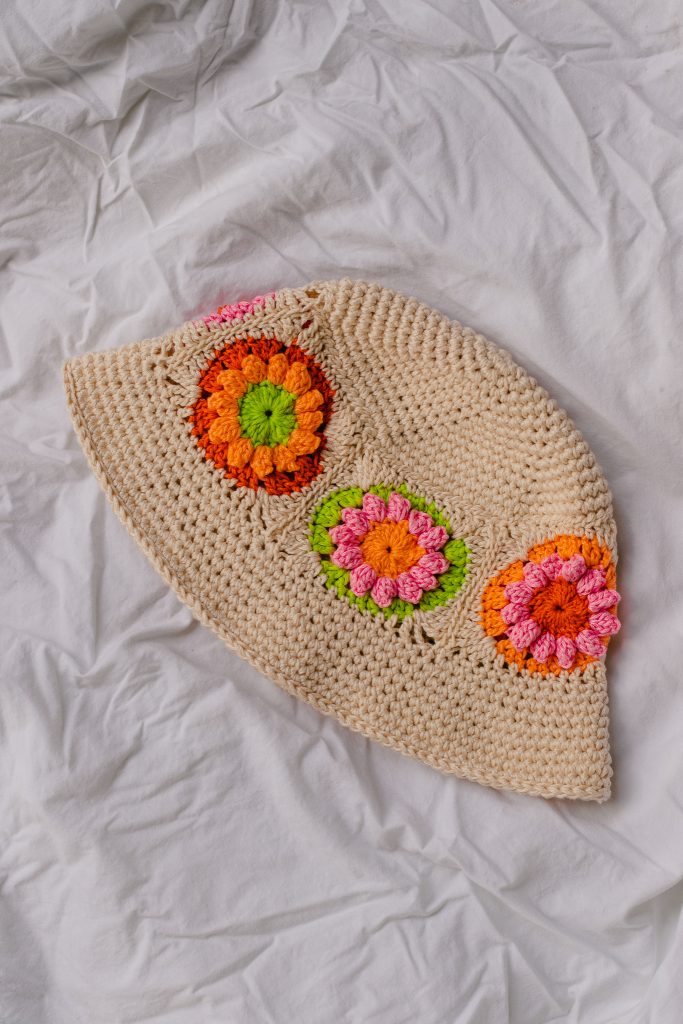
There are no bad hair days with the Flower Market Bucket Hat. This fun, feminine design will add a whimsical, vintage feel to any summery outfit. A playful granny square panel spans the circumference of this hat, bringing a pop of color to an otherwise simple design. Named “Flower Market” since picking the colors for each flower feels like picking your floral bouquet at a flower market!
Materials
Yarn: Worsted held double–Lion Brand 24/7 Cotton in 5 colorways “Ecru, Lime, Pink, Tangerine, Creamsicle”
- 100% Cotton
- 186 yds (170 m) per 3.5 oz (100 g) skein
- Find this yarn on lionbrand.com or visit yarnsub.com to find comparable substitutes
Yardage:
- Main Color (Ecru): 2 skeins or 235 yds (215 m)
- Accent Color 1 (Lime): 1 skein or 15 yds (14 m)
- Accent Color 2 (Pink): 1 skein or 15 yds (14 m)
- Accent Color 3 (Tangerine): 1 skein or 15 yds (14 m)
- Accent Color 4 (Creamsicle): 1 skein or 15 yds (14 m)
Substitute Lion Brand 24/7 Cotton with any similar medium, worsted weight (category #4) yarn that matches gauge. Cottons will work best for this project, particularly those that feel “stiff” to lend some structure to your finished hat. Note that worsted weight is often referred to as “aran” in the UK, or “10-ply” in Australia.
Hook: Size U.S. 7 (4.5 mm) or size needed to obtain gauge
Notions: Tapestry needle, scissors, and 6 locking stitch markers (1 being distinct from the others to use for BOR marker), several more locking stitch markers to help hold work in place while seaming
Gauge
Complete the swatch as instructed below.
For Swatch
Work first 8 rnds of Crown, creating a small circle. First 8 rnds of circle should measure approximately 4” (10 cm) in diameter.
Finished Measurements
Finished hat is intended to comfortably fit an average woman’s head of 21-23” (53-58 cm).
Finished hat measures approximately 22.5” (57 cm) in circumference.
Each granny square measures approximately 3.75” (9.5 cm), blocked.
Terms + Abbreviations
Written in U.S. Crochet terms
beg: beginning
BOR: beginning of round
ch: chain
ch-sp: chain space
dc: double crochet (tr in U.K. terms)
hdc: half double crochet (htr in U.K. terms)
inc: increase – work 2 sc in designated stitch
MC: main color
PM: place marker
rep: repeat
rnd: round
RS: right side
sc: single crochet (dc in U.K. terms)
sk: skip
sl st: slip stitch
st(s): stitch(es)
tr: treble crochet (dtr in U.K. terms)
Special Stitch
pc: popcorn – work 5 dc into designated stitch, remove hook, re-insert hook into first dc of the group from front to back, sl st into the last dc of the group
Techniques Used
Magic Ring (photo tutorial: page 8 of the PDF pattern)
Mattress Stitch Granny Square Join
Standing Double Crochet (photo tutorial: page 9 of the PDF pattern)
Standing Treble Crochet (photo tutorial: page 10 of the PDF pattern)
Pattern Notes
Skill Level: Beginner
Sizing: This hat is sized for an average woman’s head circumference of 21-23” (53-58 cm); however, because it is not snug nor fitted tightly to the head, this hat will be appropriate for most adult head sizes.
Stitch Counts: Stitch counts are listed after each round.
Right Side / Wrong Side: The right side will face you for the entirety of this project.
Spiral: The solid sections of this hat (crown and brim) are worked in a spiral.
Yarn Held Double: The single crochet portion of this hat (the crown and the brim) is worked with the yarn held double, meaning two strands of yarn are held together as if they were one. The granny squares are worked single stranded.
Construction: This hat is crocheted seamlessly from the top down in a spiral. You will begin with the crown, increasing each round by 6 stitches. Then, you will create 6 granny squares, each with different color combinations. These squares are seamed together side-by-side to form a granny square loop which is then attached to the crown and forms the sides of the hat. Lastly, you will work a specified number of stitches into the bottom edge of your granny square loop to set yourself up to work the brim which has staggered increases to create a clean, perfectly rounded shape.
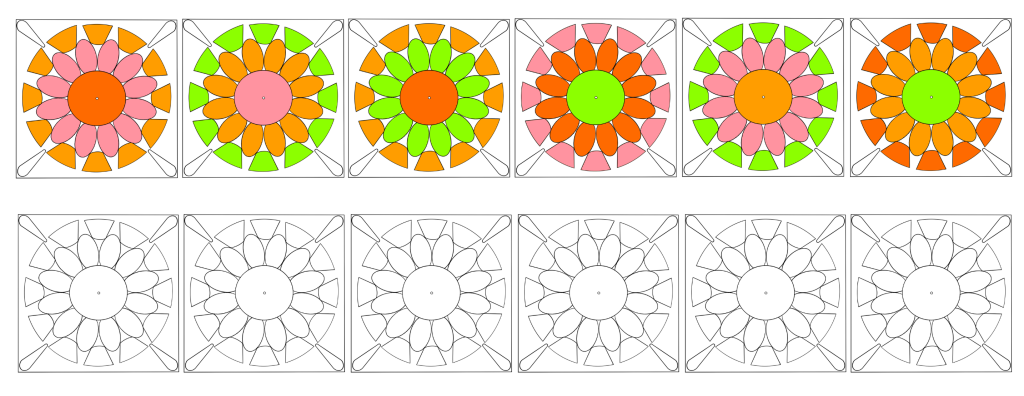
Color Combinations: Four accent colors are used within the granny square panel. The colored schematic below shows the combinations used in the sample; however, you can choose any arrangement that you like. You will have enough yardage for each of your colors that any color combination will work.
PATTERN
The text from the pattern (and one of the diagrams) is included below for free. Additional materials and resources such as photo tutorials, links, stitch tutorials and a full granny square stitch chart are included in the PDF pattern. Happy crocheting!
CROWN
This entire section is worked with yarn held double.
Using two strands of MC held double, make a magic ring (or ch 4 and sl st into first ch to create ring). See Magic Ring tutorial here.
Rnd 1: Work 6 sc into ring; do not join. [6 sc]
Rnd 2: Inc in first st (PM in first st of inc to mark BOR), *inc in next st (PM in first st of inc); rep from * to BOR (6 markers placed). [12 sc]
Move each marker up to new inc made.
Rnd 3: *Inc in next st (PM in first st of inc), sc to next marker; rep from * to BOR. [18 sc]
Rep Rnd 3 until you have completed a total of 14 rnds. Note that each rnd increases by 6 sc. [84 sc]
You can now remove all markers. Sl st into the next st.
Cut one of your strands, leaving a tail long enough to weave in. Cut the other strand, leaving a tail measuring approximately twice the circumference of your hat. You will use this long tail to stitch your granny square panel to the crown of your hat.
GRANNY SQUARE (MAKE 6)
Notes:
- Each granny square is worked single stranded and is not held double like the rest of your hat.
- The RS will face you as you crochet the entire granny square.
- Each rnd is worked in a different color. Be sure to reference your chosen color arrangement on page 3 to determine the correct color sequence for each flower.
- After completing each rnd, you will be instructed to fasten off and weave in ends. This is because each subsequent rnd begins with a standing stitch, which is a clean way to begin a new rnd without requiring a sl st or beg ch. See pages 9 and 10 of the PDF pattern for photo tutorial on standing stitches or watch the supplementary video tutorials linked on page 2.
With your chosen color for the center of the flower, make a magic ring (or ch 4 and sl st into first ch to form ring).
Rnd 1 (Center of Flower): Ch 3 (counts as 1 dc), work 23 dc into ring, sl st into top of beg ch to join rnd, cut yarn, weave in this end. [24 dc]
Using the beg tail, tightly cinch your ring closed (a small gap will remain in the center) and weave in this end.
Rnd 2 (Petals): Using petal color, join new yarn with a standing dc into any st (does not have to be where your Rnd 1 join is located), work 4 more dc into same st (5 dc total worked so far), complete the remainder of this pc, [ch 2, sk 1 dc, pc in next dc] 11 times, sk 1 dc, ch 2, sl st into top of first pc to join rnd, cut yarn, weave in ends. [12 pc, 12 ch2-sps]
Rnd 3 (Flower Background): Using next color, join new yarn with a standing dc into any ch2-sp (does not have to be where your Rnd 2 join is located), work 2 more dc into same ch2-sp, work 3 dc into each ch2-sp, sl st into top of beg ch to join rnd, cut yarn, weave in ends. [36 dc]
Rnd 4 (MC): Using MC, join new yarn with a standing tr into any space between 3-dc clusters, *work 2 dc in next dc, hdc in each of the next 2 dc, sc in each of the next 3 dc, hdc in each of the next 2 dc, work 2 dc in next dc, (tr, ch 2, tr) into next space between 3-dc clusters; rep from * 2 more times, work 2 dc in next dc, hdc in each of the next 2 dc, sc in each of the next 3 dc, hdc in each of the next 2 dc, work 2 dc in next dc, tr in same space as first standing tr, ch 1, sc into first tr to join rnd, cut yarn, leaving a tail measuring at least 12″ (30 cm) for seaming your squares together later. [4 ch2-sps and 13 sts on each edge of your square]
Note: Rnd 4 ends with a sc into the first tr to join the rnd (rather than working two chs and a sl st). This sc will position your finishing tail to be exactly in the corner of your granny square, which will be helpful when you are seaming your squares together later.
Block each granny square using preferred blocking method before proceeding.
Seaming Your Granny Squares Together
Arrange each of your 6 unique granny squares in your desired order, rotating each square so that the tails are each in the same position (as shown below). This way, one tail can be used for each seam, as indicated by the arrows. Using several locking st markers, pin your squares in place so that your 6 granny squares form a loop.
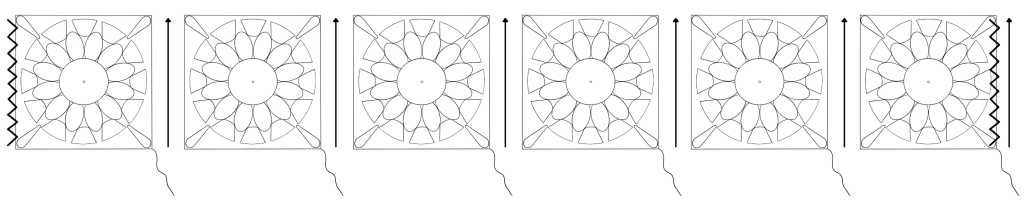
With the RS facing you, seam each of your squares together using a tapestry needle and the 12” (30 cm) tail using the mattress stitch. Once each seam is completed, fasten off, tie a double knot, and weave in your ends on the inside of the hat so that they do not accidentally pop out to the RS.
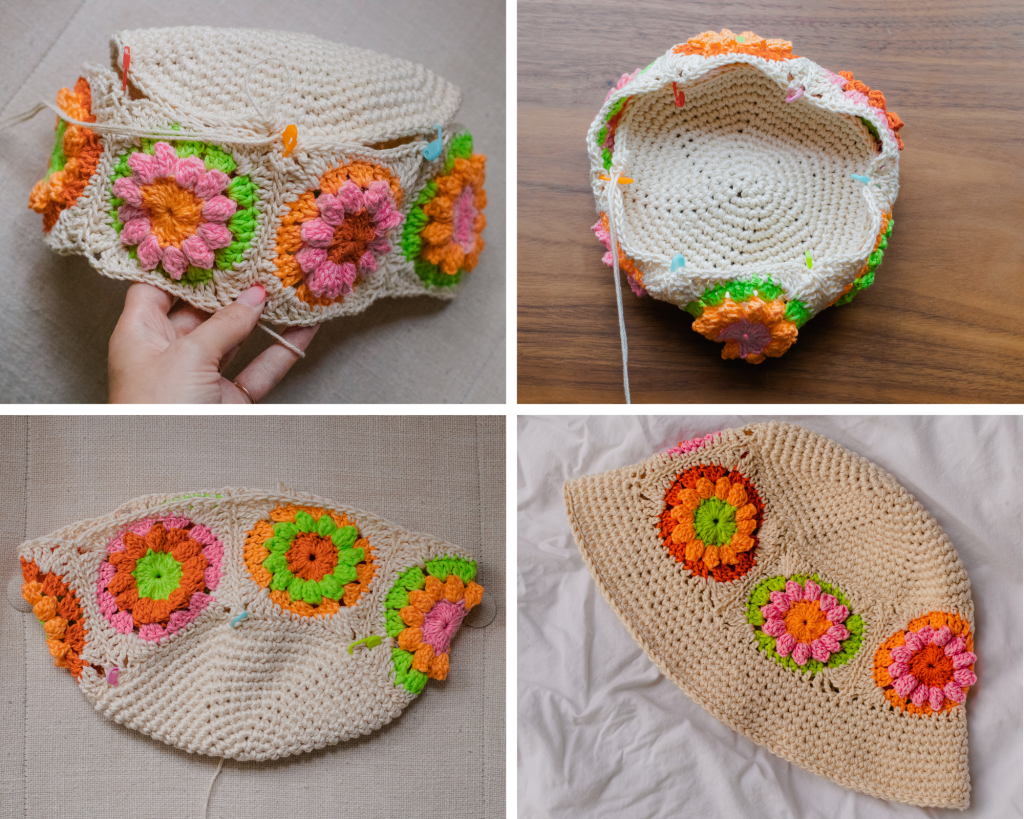
Seaming Your Granny Square Loop to the Crown
Pin your granny square loop to the crown of your hat using several locking st markers to hold your work in place to prepare for seaming. Each granny square should be pinned across approximately 14 sc sts from your crown for an even placement. See supplementary photos on page 7 of the PDF pattern. Once pinned in place, you are ready to begin seaming.
Return to the tail remaining from your crown that has been cut to approximately twice the circumference of your crown, and thread your tapestry needle with this long tail. With the WS facing you, whip stitch your granny square loop to the sts from your crown. Rep until you have seamed the entire circumference of your hat, fasten off and weave in ends.
See supplementary photo on page 7 of the PDF pattern.
Your granny square panel is now completely joined to your crown and you are ready to crochet the brim.
BRIM
The remainder of your hat is worked with yarn held double.
With the RS facing you, using two strands of MC held double, join new yarn with a sl st to any st along the bottom edge of your granny square loop where two squares intersect.
Rnd 1 (Set-Up Rnd): Ch 1, then, while placing your sts as evenly as you can into the edges of your granny square panel, *work 14 sc across the next granny square, PM in 14th st worked; rep from * to end of rnd, using a distinct BOR marker for final marker placed (6 markers placed in total), sc into first sc to set yourself up to work in a spiral. [84 sc]
Next, you will begin to increase for the brim, staggering the placement of the increases to create a nicely rounded brim. (If the increases are stacked, your brim will form a hexagonal shape!)
Rnd 2: Sc in next 2 sts, inc in next st (replace BOR marker into first st of inc), sc in each st up to and including next marker, remove marker, sc in next 3 sts, *inc in next st (replace marker into first st of inc), sc in each st up to and including next marker, remove marker, sc in next 3 sts; rep from * up to and including BOR marker. [90 sc]
Rnds 3-8: Rep Rnd 2. [Each rnd increases st count by 6 sc; 126 sc at end of Rnd 8]
Last Rnd: Sl st into each st around, remove any remaining markers, fasten off, weave in ends.

#FlowerMarketBucketHat
Thanks so much for reading!
Shop the full Flower Market Bucket Hat crochet kit here (comes with all yarn required + FREE copy of the PDF pattern)!
Find the pattern PDF in these places:
On Ravelry
On Etsy
On My website
For free in the Flower Market Bucket Hat crochet kit here!
x
Janine
You can find my full print book, Modern Crochet Sweaters: 20 Chic Designs For Everyday Wear on the shelves of all major retailers or see purchasing options here! (And stay tuned for Book #2 coming Spring 2025!)
For exclusive discounts on all new patterns, join the Knits ‘N Knots newsletter list here!
You May Also Like


