
Hi everyone!
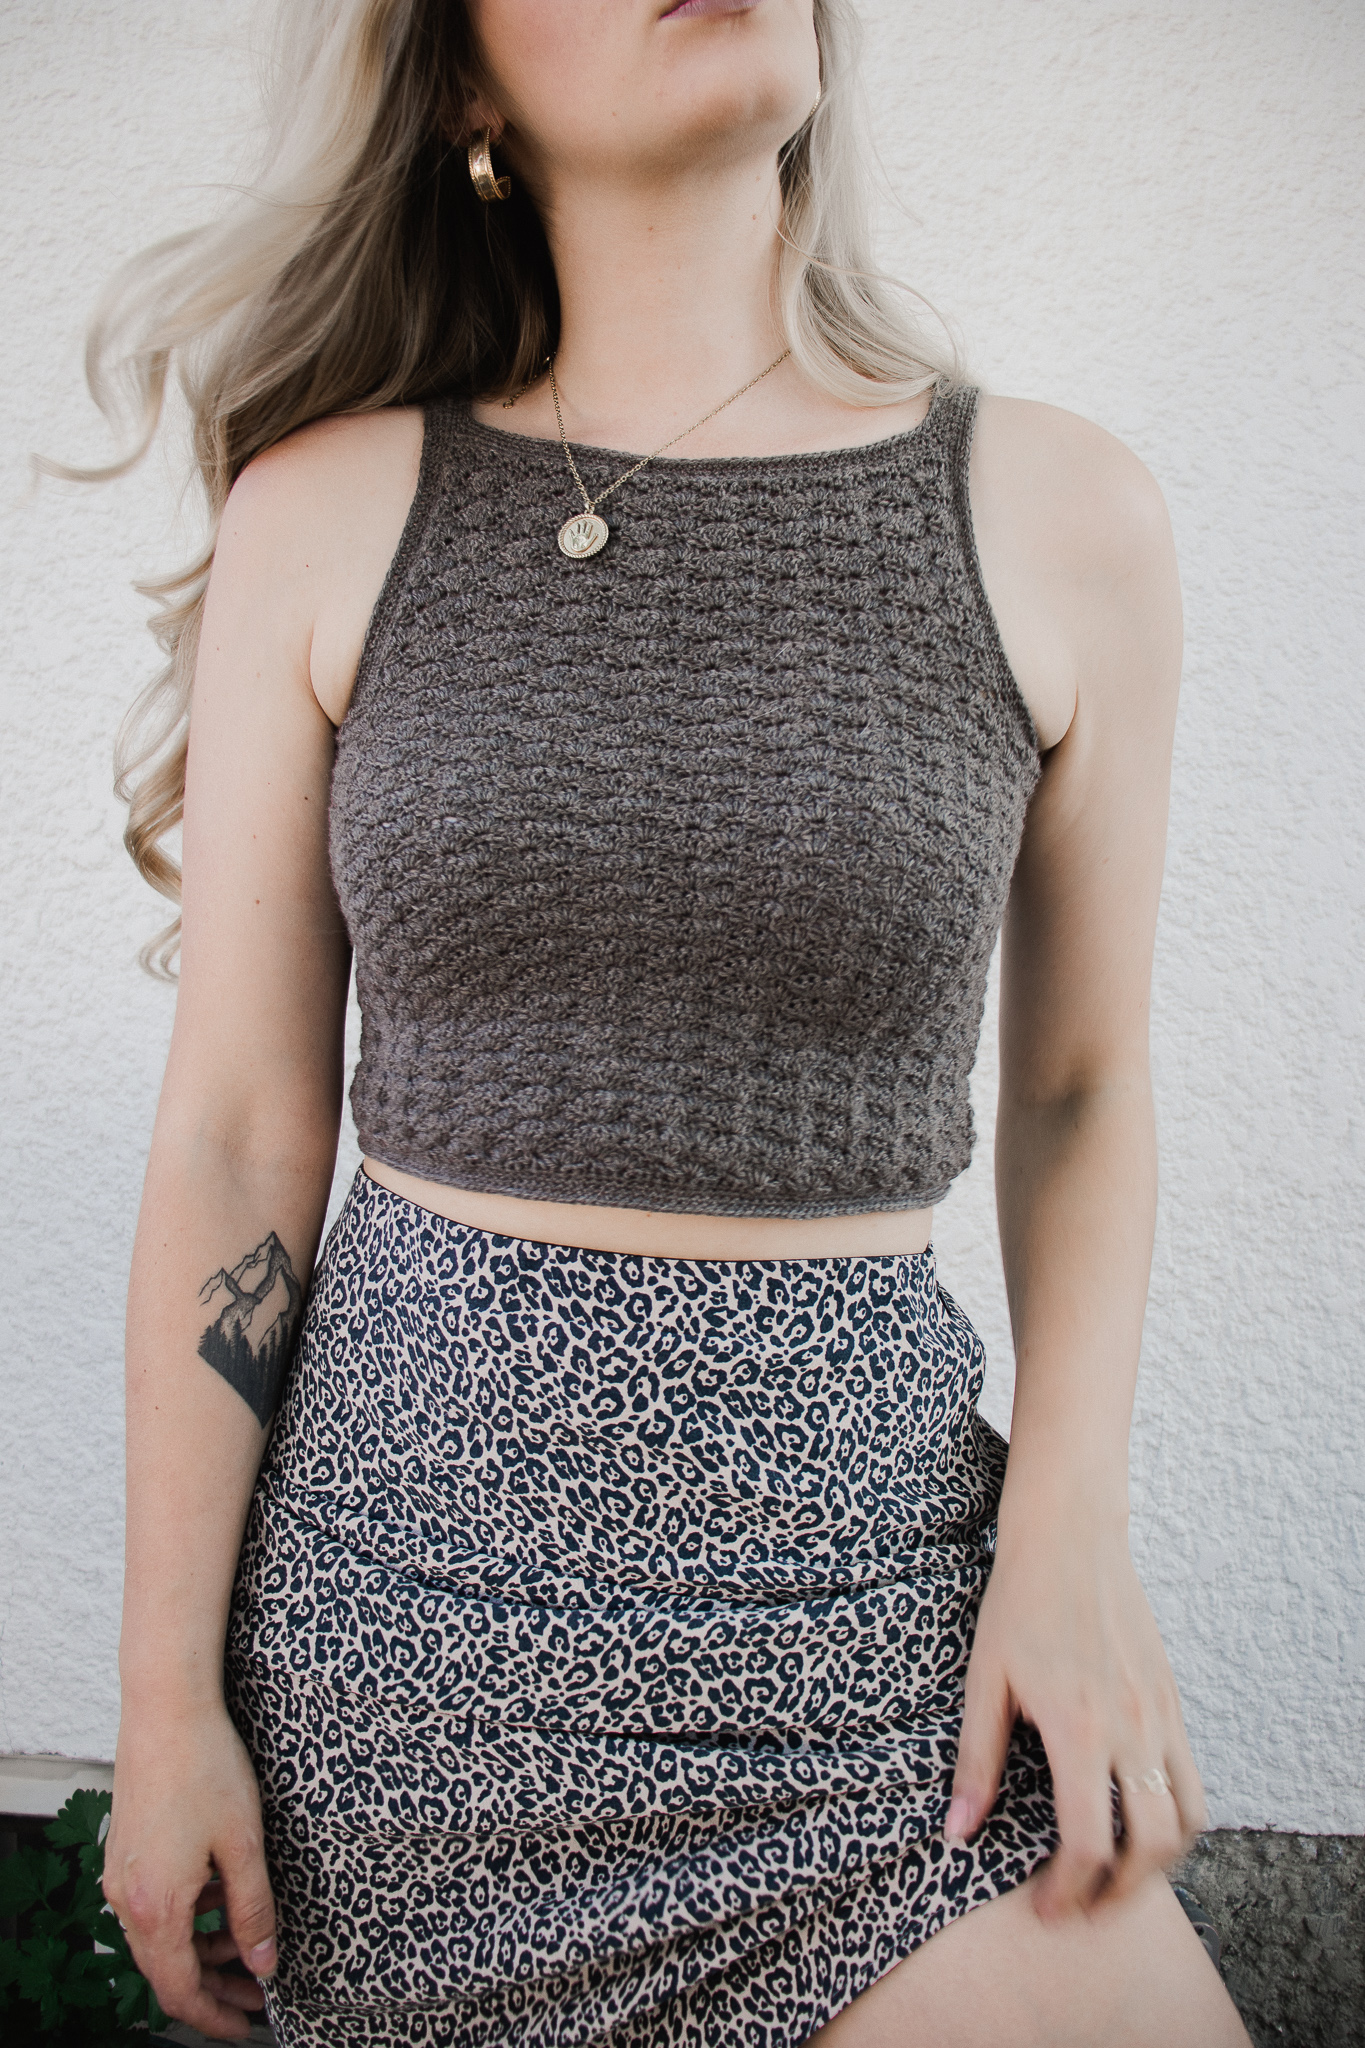
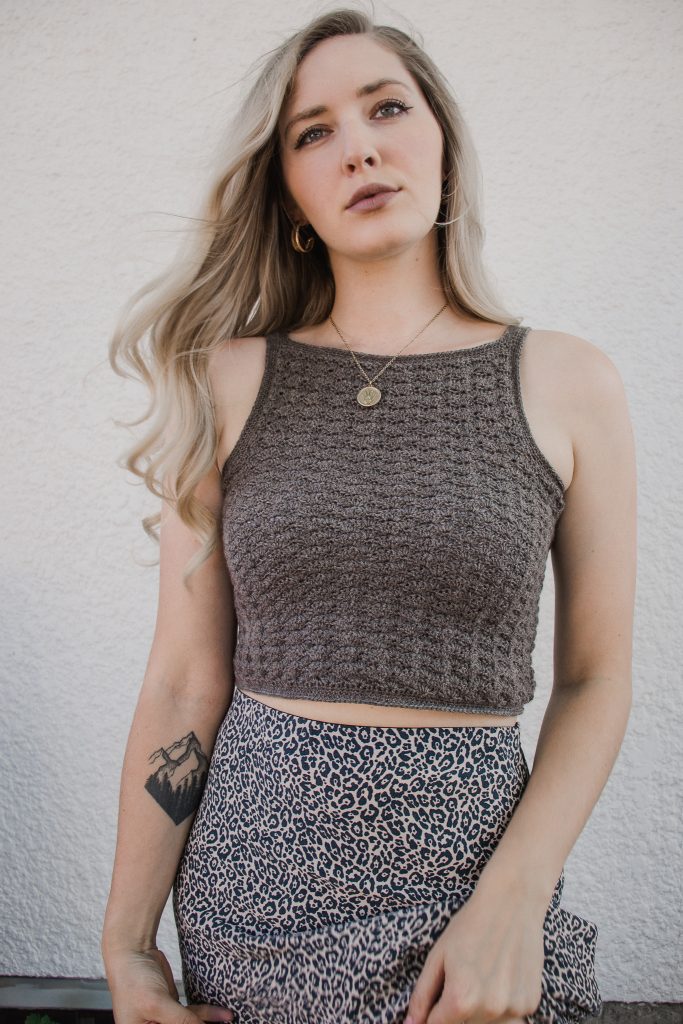
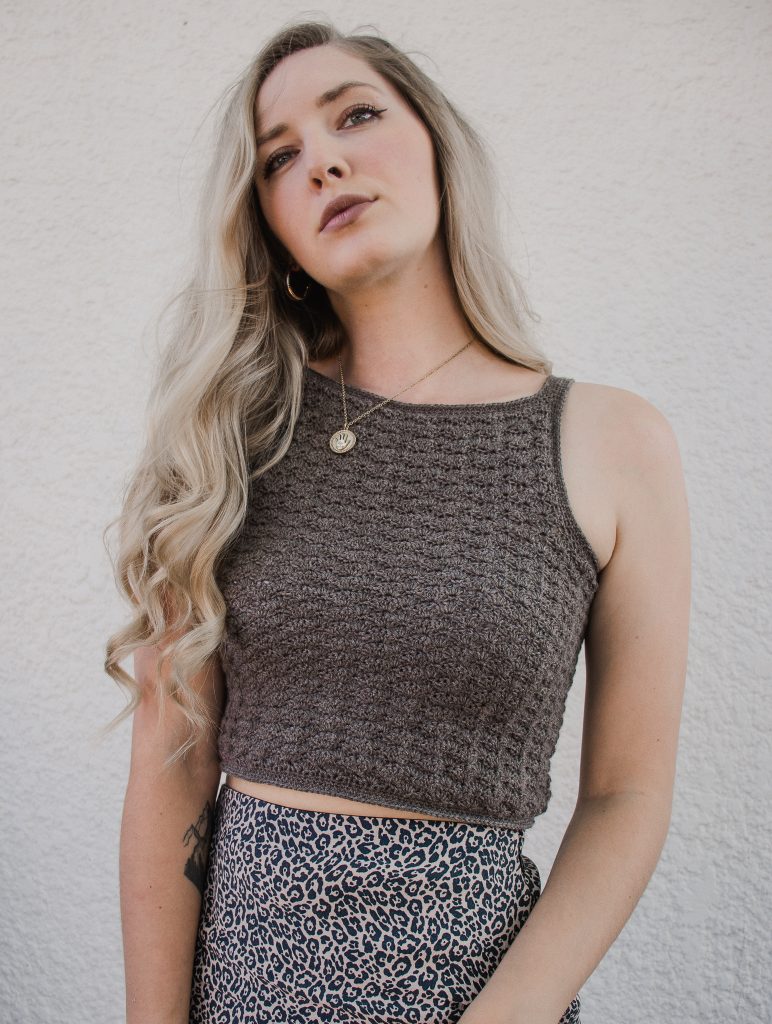
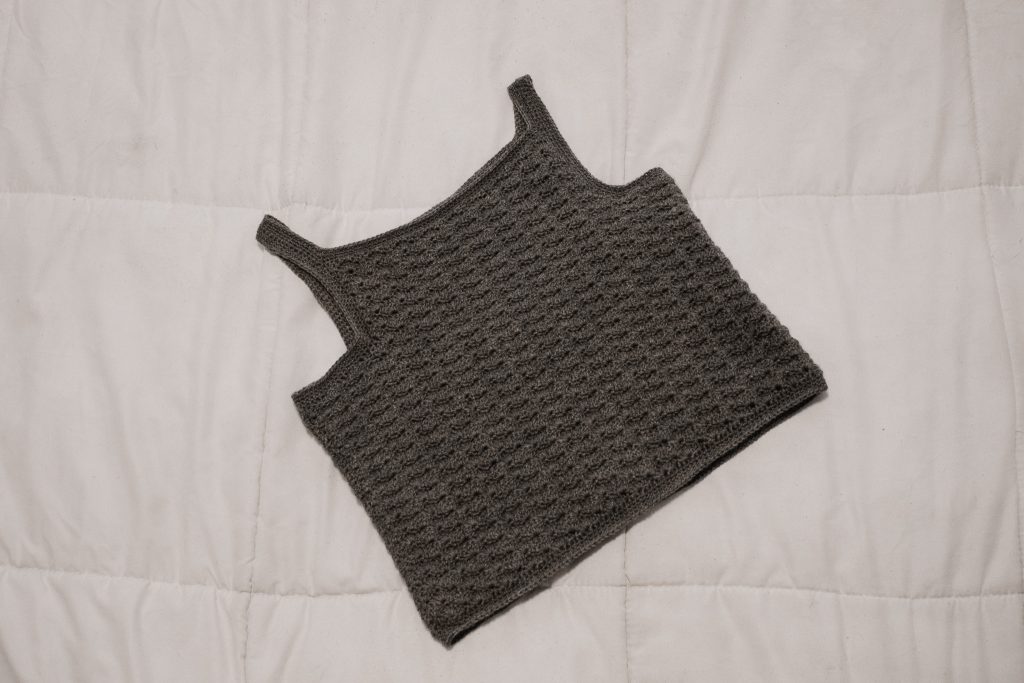
Today I’m sharing a brand new FREE tank top pattern using WeCrochet Stroll called the Desert Stroll Tank.
When I first shared this on Instagram earlier this week, you guys went crazy for this piece! The solid fabric, high neckline, and modest fit all contribute to this design being practical, wearable, and comfortable. Hope you love it!
Before we begin, here are some quick links for you:
- Find the PDF version on Ravelry here, and on my website here.
- Add your finished project and view other completed projects on Ravelry here.
- Use the pattern hashtag #DesertStrollTank on Instagram to show off your makes!
- Shop WeCrochet Stroll here!
- View last month’s free pattern with WeCrochet: Chasing Summer Tank
- Shop my WeCrochet exclusive summer pattern bundle here (5 patterns for $9.99)
- For any questions about this pattern, please email knitsnknotswpg@gmail.com and I’ll get back to you asap!
Preorder my book – Modern Crochet Sweaters: 20 Chic Designs for Everyday Wear – here!
If you want to be notified of all new pattern releases (and get exclusive discounts on all new paid patterns), sign up below!
This post contains affiliate links. This means, should you make a purchase, I will receive a small portion of the sale at no extra cost to you. All opinions are my own. View my Privacy + Disclosures Policy here. This post is sponsored by We Crochet.

About
Say hello to your next go-to summer staple. This sleeveless top brings all the 90’s vibes and proves that crochet isn’t just for heavy winter sweaters. It was named Desert Stroll after the yarn chosen for this design (WeCrochet Stroll) combined with the deliciously wavy texture, reminiscent of sand dunes.
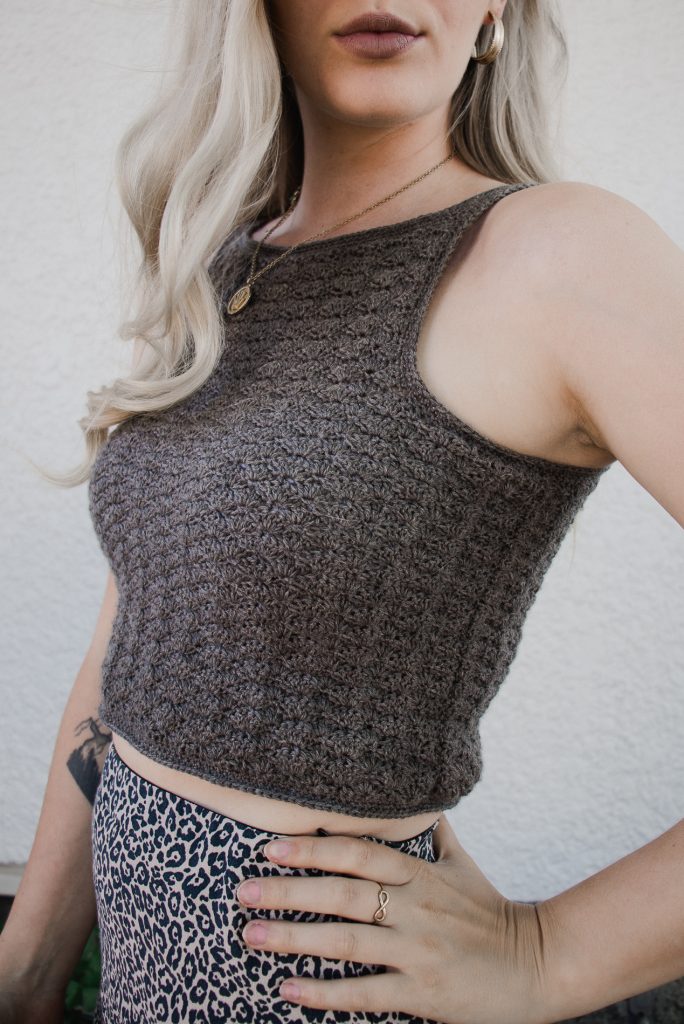
This is an approachable, easy-level crochet pattern with a sophisticated fit. The high neckline and solid fabric provide great coverage, bringing a level of functionality and practicality to this design for regular, everyday wear without feeling too exposed. A few simple finishing rows are worked along all the raw edges to add a refined, store-bought look that can be hard to find in crochet pieces. The negative ease tricks the eye by creating the appearance of shaping in the upper portion of this tank top, while in fact, each panel is created entirely from two rectangles without any decreasing.
Crocheted in a delicate shell stitch pattern that will keep your interest from start to finish, Desert Stroll has plenty of customizable elements sprinkled throughout the pattern to help make this piece feel more “you”.
Schematic + Sizing Chart
This pattern is written in 9 sizes: XS (S, M, L, XL) (2X, 3X, 4X, 5X) to fit bust sizes 28-30 (32-34, 36-38, 40-42, 44-46) (48-50, 52-54, 56-58, 60-62)“. If you’re unsure which size you fall under, you can check out this sizing chart.
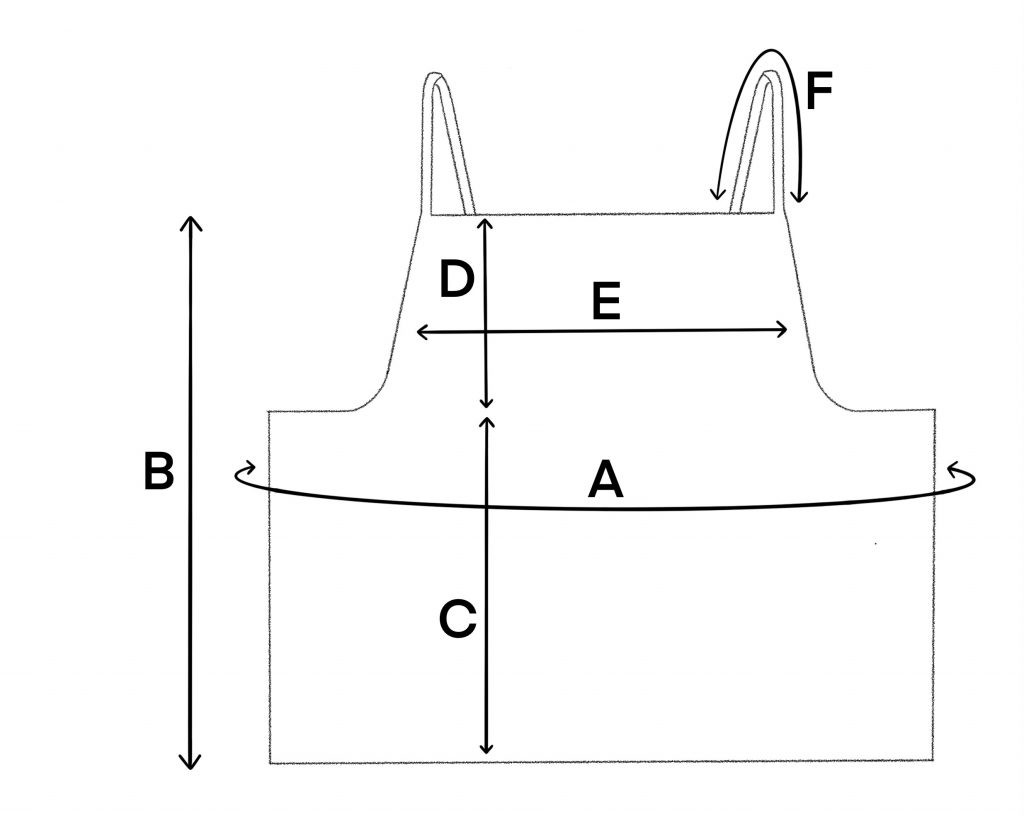
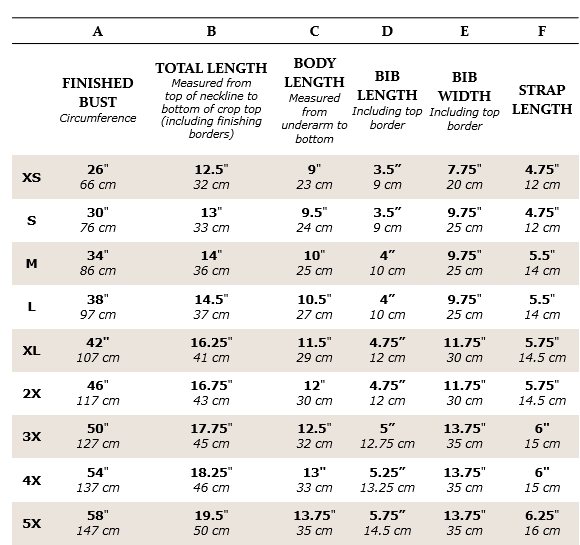
This chart shows the finished garment measurements. This tank top is designed to be worn with approximately 2-4 inches [5-10 cm] of negative ease. Choose a size with a finished bust measurement that is 2-4 inches [5-10 cm] smaller than your actual bust measurement. You may also choose to make a size with a finished bust that is closest to your actual bust measurement for less negative ease and a more relaxed fit.
For reference, the model has a 34-inch [86-cm] bust and is wearing a size small with a finished garment bust measurement of 30 inches [76 cm] with approximately 4 inches [10 cm] of negative ease. If between sizes, size up.
Materials
Yarn: Fingering—WeCrochet Stroll in Jack Rabbit Heather
- 75% Fine Superwash Merino Wool, 25% Nylon
- 231 yds [211 m] per 1.8-oz [50-g] skein
- Find this yarn on crochet.com or visit yarnsub.com to find comparable substitutes.
Yardage: 3 (3, 4, 4, 5) (6, 6, 7, 8) skeins or 525 (650, 750, 875, 1075) (1200, 1375, 1525, 1675) yds [481 (595, 686, 801, 983) (1098, 1258, 1395, 1532) m]
Substitute WeCrochet Stroll with any similar fingering weight, category #1 yarn that matches gauge. Choose a breathable fiber that you would like to wear on your skin for long periods of time, keeping in mind that this tank top is likely going to be worn in warm weather and is close-fitting with 2-4” [5-10 cm] of negative ease.
Hook: Size U.S. F/5 (3.75 mm) crochet hook or size needed to obtain gauge
Notions: Tapestry needle, 2 locking stitch markers
Abbreviations (U.S. Terms)
ch: chain
dc: double crochet
FSC: foundation single crochet
hdc: half double crochet
rep: repeat
sc: single crochet
sc2tog: single crochet 2 stitches together
shell: work 5 dc into designated stitch
sk: skip
sl st: slip stitch
st(s): stitch(es)
Gauge + Swatch Instructions
4 x 4″ [10 x 10 cm] = 4 shells and 15 rows in shell stitch (see swatch instructions below)
For Swatch
FSC 37.
Follow instructions for Body Panel Rows 1–3.
Rep Rows 2 and 3 until your swatch measures approximately 6″ [15 cm] in height.
Block your swatch. Measure the innermost 4″ [10 cm] of your blocked swatch to get the most accurate measurement.
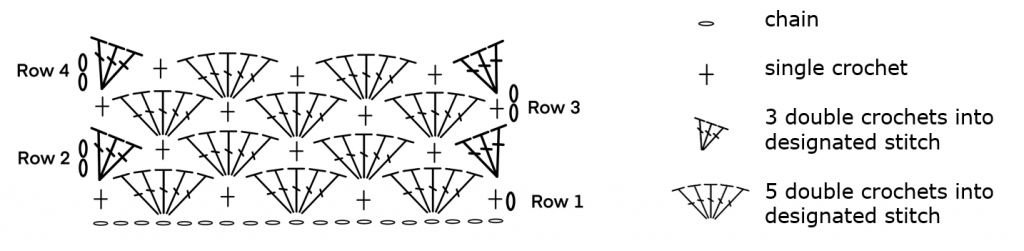
Stitch Chart
Pattern Notes
Sizing: This sweater is written in nine sizes as follows: XS (S, M, L, XL) (2X, 3X, 4X, 5X). Make sure to follow the numbers for your size only.
Stitch Counts: Stitch counts are listed after each row. If no stitch count is given, there has been no change since the previous row. If only one number is provided, it applies to all sizes.
Reversible: There is no right side or wrong side until working the bottom border, the straps, and the neckline. You choose which side to wear as the “right side.”
Seaming: When seaming the sides of your tank top, make sure to keep these seams loose and do not pull too tight in order to maintain some stretch.
Turning Chain: The turning chain does not count as a stitch.
Bib: Throughout this pattern, the term “bib” refers to the upper portion of the tank top that is worked onto the body, shown below using letters D and E.
Construction: This crop top is worked in two identical pieces that get seamed together along the sides. You will then work in the round to create the border along the bottom circumference, along each side to create the straps, and around the neckline.
PATTERN
PANEL (Make 2)
Body
Foundation Row: Leaving a 24” [61 cm] tail on one of your panels for seaming the sides of your top, FSC 79 (91, 103, 115, 127) (139, 151, 163, 175).
Row 1: Ch 1, sc in first st, *sk next 2 sts, shell in next st, sk next 2 sts, sc in next st; rep from * to end of row, turn. [13 (15, 17, 19, 21) (23, 25, 27, 29) shells]
Row 2: Ch 2, work 3 dc in first sc, *sk next 2 dc, sc in next dc, sk next 2 dc, shell in next sc; rep from * to end of row, omitting very last shell of final rep, work 3 dc in final sc of row, turn.
Row 3: Ch 1, sc in first dc, *sk next 2 dc, shell in next sc, sk next 2 dc, sc in next dc; rep from * to end of row, turn.
Rep Rows 2-3 until you have worked a total of 32 (34, 36, 38, 42) (44, 46, 48, 50) shell stitch rows, finishing with a Row 2 rep. If you matched gauge, this should be approximately 8.5 (9, 9.5, 10, 11.25) (11.75, 12.25, 12.75, 13.25)” [22 (23, 24, 25, 28.5) (30, 31, 32, 34) cm]. This is the length of the body of your sweater up to your underarm before the shaping begins.
Do not fasten off; you will continue working with the same yarn for the next section.
Customization Tip: If you would like your top to be longer or shorter than written for your size, add or subtract rows in multiples of 2 as you see fit. You should finish on a Row 2 rep. Make note of how many rows you added or eliminated so that you can make the same alteration to both panels.
Bib
Next, you will be instructed to place two markers to designate the placement of your bib. Since you finished your body on a Row 2 rep, you should have half-shells at the edges of your most recently completed row. Ignoring these edge half-shells, count 3 (3, 4, 5, 5) (6, 6, 7, 8) full shells inward from either side and place a marker in the center dc of this shell (one marker per side = two markers total). The bib piece that extends up to your collar bone will be worked in between these markers.
Before you work the bib, you will crochet a finishing row up to the first marker to even out the undulating shell stitches and get a top edge that is flat and uniform. Next, you will work a section of shells in between your two markers, and then complete the row with similar finishing instructions.
Continuing with the same yarn –
Row 1:
- Part 1 (Finishing Row): Ch 1, sl st in first dc, sc in next dc, hdc in next dc, dc in next sc, hdc in next dc, sc in next dc, [sl st in next dc, sc in next dc, hdc in next dc, dc in next sc, hdc in next dc, sc in next dc] 2 (2, 3, 4, 4) (5, 5, 6, 7) times. The marked st should be your next st.
- Part 2 (Shell Stitch Section): Sc in marked dc and move marker up to this new st, *sk next 2 dc, shell in next sc, sk next 2 dc, sc in next dc; rep from * 6 (8, 8, 8, 10) (10, 12, 12, 12) more times. Your last sc should be worked into your second marked st; move the marker up to this new st.
- Part 3 (Finishing Row): Sc in next dc, hdc in next dc, dc in next sc, [hdc in next dc, sc in next dc, sl st in next dc, sc in next dc, hdc in next dc, dc in next sc] 2 (2, 3, 4, 4) (5, 5, 6, 7) times, hdc in next dc, sc in next dc, sl st in next dc, turn.
Row 2: Ch 1, sc in each st up to first marker, ch 2, work 3 dc in marked sc (move marker up to the first of these three dc), sk next 2 dc, sc in next dc, *sk next 2 dc, shell in next sc, sk next 2 dc, sc in next dc; rep from * across row until working into the final shell, sk next 2 dc, work 3 dc in next sc, turn. [7 (9, 9, 9, 11) (11, 13, 13, 13) shells in between your two markers]
For the rest of this section, you are going to be working back-and-forth between your marked sts to complete the bib. You can remove the markers now.
Row 3: Ch 1, sc in first dc, *sk next 2 dc, shell in next sc, sk next 2 dc, sc in next dc; rep from * to end of row, turn.
Row 4: Ch 2, work 3 dc in first sc, *sk next 2 dc, sc in next dc, sk next 2 dc, shell in next sc; rep from * to end of row, omitting very last shell of final rep, work 3 dc in final sc of row, turn.
Rep Rows 3 and 4 until you have worked a total of 12 (12, 14, 14, 16) (16, 18, 18, 20) rows, finishing on a Row 4 rep. If you matched gauge, your bib should measure approximately 3.25 (3.25, 3.75, 3.75, 4.25) (4.25, 4.75, 4.75, 5.25)” [8.25 (9, 9.5, 10, 10.75) (11.5, 12, 12.75, 13.25) cm]. For a taller or shorter bib than the measurements provided for your size, simply rep Rows 3 and 4 until reaching your desired measurements, making sure to finish with a Row 4 rep.
Do not fasten off; continue below.
Top Finishing Row
Next, you will work one row along the top edge to even out the undulating shell stitches and create a flat, uniform top edge onto which you will crochet the straps.
Ch 1, sl st in first dc, *sc in next dc, hdc in next dc, dc in next sc, hdc in next dc, sc in next dc, sl st in next dc; rep from * to end of row.
Fasten off.
Seaming the Sides
Lay your panels on top of one another with the long tails from your foundation chains on opposite sides. With a tapestry needle, seam the sides of your panels using the whip stitch or seaming method of your choice, doing your best to keep the rows aligned between panels. Fasten off, weave in ends.
Bottom Border
Choose which side you would like to wear as the right side. With right side facing, join yarn to the bottom edge at one of the side seams with a sl st. Ch 1, sc into each st from your foundation chain around the circumference of your top until reaching the first sc [do not join], sc directly into first sc to begin working in a spiral, sc into each sc along your bottom border for 3 more rounds or until desired border width, then sl st into next 3 sts, fasten off, weave in ends.
Straps
Customization Tip: For longer or shorter straps, work a longer or shorter chain than instructed for your size. Try on your top periodically as you are crocheting this section to be sure you are happy with the way it fits your body. Adjust chain length if necessary.
With right side facing, join yarn to one of the side seams at the center of the underarm with a sl st, ch 1, sc into each st until reaching the corner where your bib begins, sc2tog in this approximate corner, sc evenly up the bib until reaching the top corner, ch 30 (30, 34, 34, 36) (36, 38, 38 40), sc into top corner of bib on opposite panel, sc evenly down the edge of the bib until reaching the corner where the bib meets the underarm, sc2tog in this approximate corner, sc evenly until reaching the first sc of rnd, sl st directly into this first sc to set yourself up to work in a spiral, sc in each st around for 3 more rnds or until desired width (keep in mind your strap will double in width after you work the neckline). Once you have completed your final rnd, sl st into next 3 sts, fasten off, weave in ends.
Rep these instructions for second strap.
Neckline Border
This section adds a thin border to match the rest of the design while simultaneously doubling the thickness of your straps.
Designate a front side and back side to your two panels. Lay your tank top flat with the back panel-right side facing and join yarn with a sl st to the right-hand corner where the neckline meets the straps. (If you are a left-handed crocheter, join yarn to the left-hand corner.)
Ch 1, *sc in each st across the top of your bib until reaching the opposite corner where the bib meets the strap, sc2tog in this approximate corner, sc into each st along your strap until reaching the bib on the other panel, sc2tog in this approximate corner; rep from * once more, sc directly into first sc to set yourself up to work in a spiral, sc in each st around for 3 more rnds (for thicker straps, work additional rnds), once you’ve completed your final rnd, sl st into next 3 sts, fasten off, weave in ends.
Weave in any remaining ends and block to the measurements in the sizing chart.
#DesertStrollTank
That’s it! Hope you love your new tank top. I’m so happy to hear how much you guys are loving this design, please tag me so I can see your work and share it on my channels!
If you’d like an easy-to-read printable PDF, find it here on my website or here on Ravelry. Thank you in advance for the support!
If you love warm-weather crochet, check out my post here which includes 21 lightweight spring pieces!
Here are some other free patterns you might like – the Chasing Summer Tank, Goldstone Bralette, Linden Cardigan, and the Teulon Tank!
Pre-order my book Modern Crochet Sweaters here!
I can’t wait to see your WIPs! Make sure to tag me @knitsnknotswpg and use the pattern hashtag #DesertStrollTank so that everyone can see your projects!
Happy crocheting,
x
Janine
You May Also Like
Anne Kaltschmidt
Hi! I tried out the pattern and it came out great. it was easy to adjust to different gauge because of the clear concept and the stitch looks so interesting stretched sideways (i have never been a fan of shells). btw: I simply followed the instructions one size down.
hook: 4 mm
yarn: Lana Grossa, Gomitolo denim
Best regards and thank you!
26 . Jun . 2021Janine Myska
Thank you so much, Anne! I’m so happy you like the pattern 🙂
30 . Jun . 2021Janine x